Cheap Dnydns Solution With Aws
howto aws dyndns
Incentive
Do you want a DynDns (dynamic dns) solution for about 1€ per month?
You can have that with a credit card, an AWS account and a few lines of code.
Idea
If you own a credit card you are able to create an AWS account (AWS is “Amazon Web Services”, the currently biggest cloud provider), register a domain and with a few lines of code update a DNS record if your IP adress changes.
Use case
You e.g have
- a computer at home with changing IP addresses
- another AWS instance that does not use an elastic IP
- some appliance running Linux
This guide will show how you can setup a dyndns solution with AWS on a Linux computer.
Costs
You need two things that will cost money:
- a DNS domain (that you can register with AWS), and
- a hosted zone (the place where the DNS entries live)
The hosted zone costs $0.50 per month and the domain can be as cheap as $3 per year:
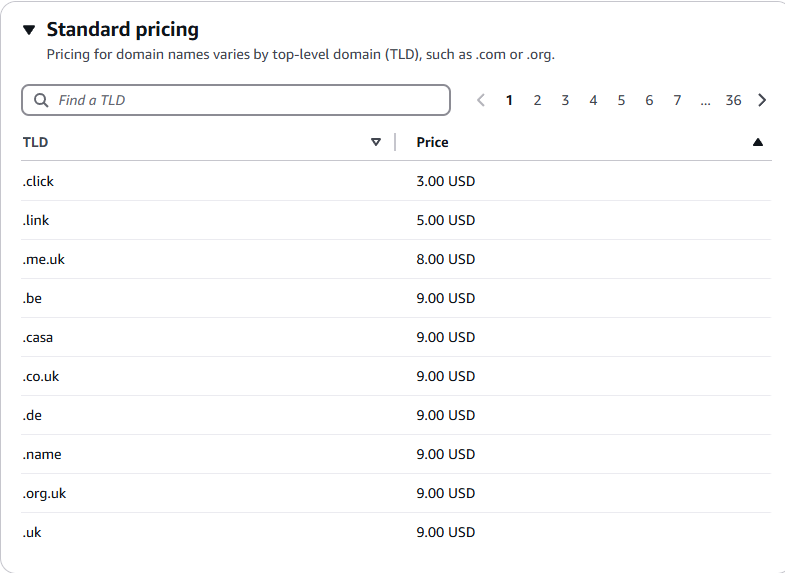
.de is the country TLD of Germany and .be the TLD of Belgium but both are free to register (you do not have to be living in those countries). The cheapest generic options would be .click, .link or .name.
Setup
AWS Account
Have you credit card ready. Go to https://aws.amazon.com/ and click on “Create an AWS Account” on the top-right.
- create a root user (the one that registers the AWS account)
- do not use your usual email adress for the registration. consider creating a seperate one only for this use. do not use it otherwise.
- the Account Name does not really matter

Follow through the dialogs:
Enter the captcha (if you get one) and verify your email address. Choose a good password (better a long passphrase) for the root user (you rarely use that). Do not reuse the password. Enter your contact information, agree on the terms and continue. Go through the rest of the dialog pages (like billing information,…) and finish setting up the account. You also have to verify your email address. You will get an email from amazon stating that it can take up to 24 hours until your account is fully active.
Secure your account with MFA
I would suggest setting up MFA (multi factor authentication) for the signins (not only the root user). I would even say this is required. Anyone hacking your account can immediately create stuff and cause thousands of Dollars/Euros of damages you have to pay. So it should be mandatory to use at least two or three authentication methods.
- do not use your usual email adress for the registration. consider creating a seperate one only for this use. do not use it otherwise.
- use a long passphrase that you save in a password safe or something similar. Do not reuse that passphrase.
- additionally configure google authenticator or similar as the 2nd factor for authentication
- also use the authenticator for the console access of the actual user
Follow this AWS documentation to enable MFA (e.g. authenticator app) for your root account.
Setup a second user with console access
The last step here for the aws account creation would be to create another user to login to your aws account (you are not supposed to use the root user for regular logins).
Login to the AWS Console with your root account.
Go to Services > IAM > Users, and click “Create User”.
Check the box “Provide user access to the AWS Management Console”. (save the password somewhere safe, do not reuse this password)
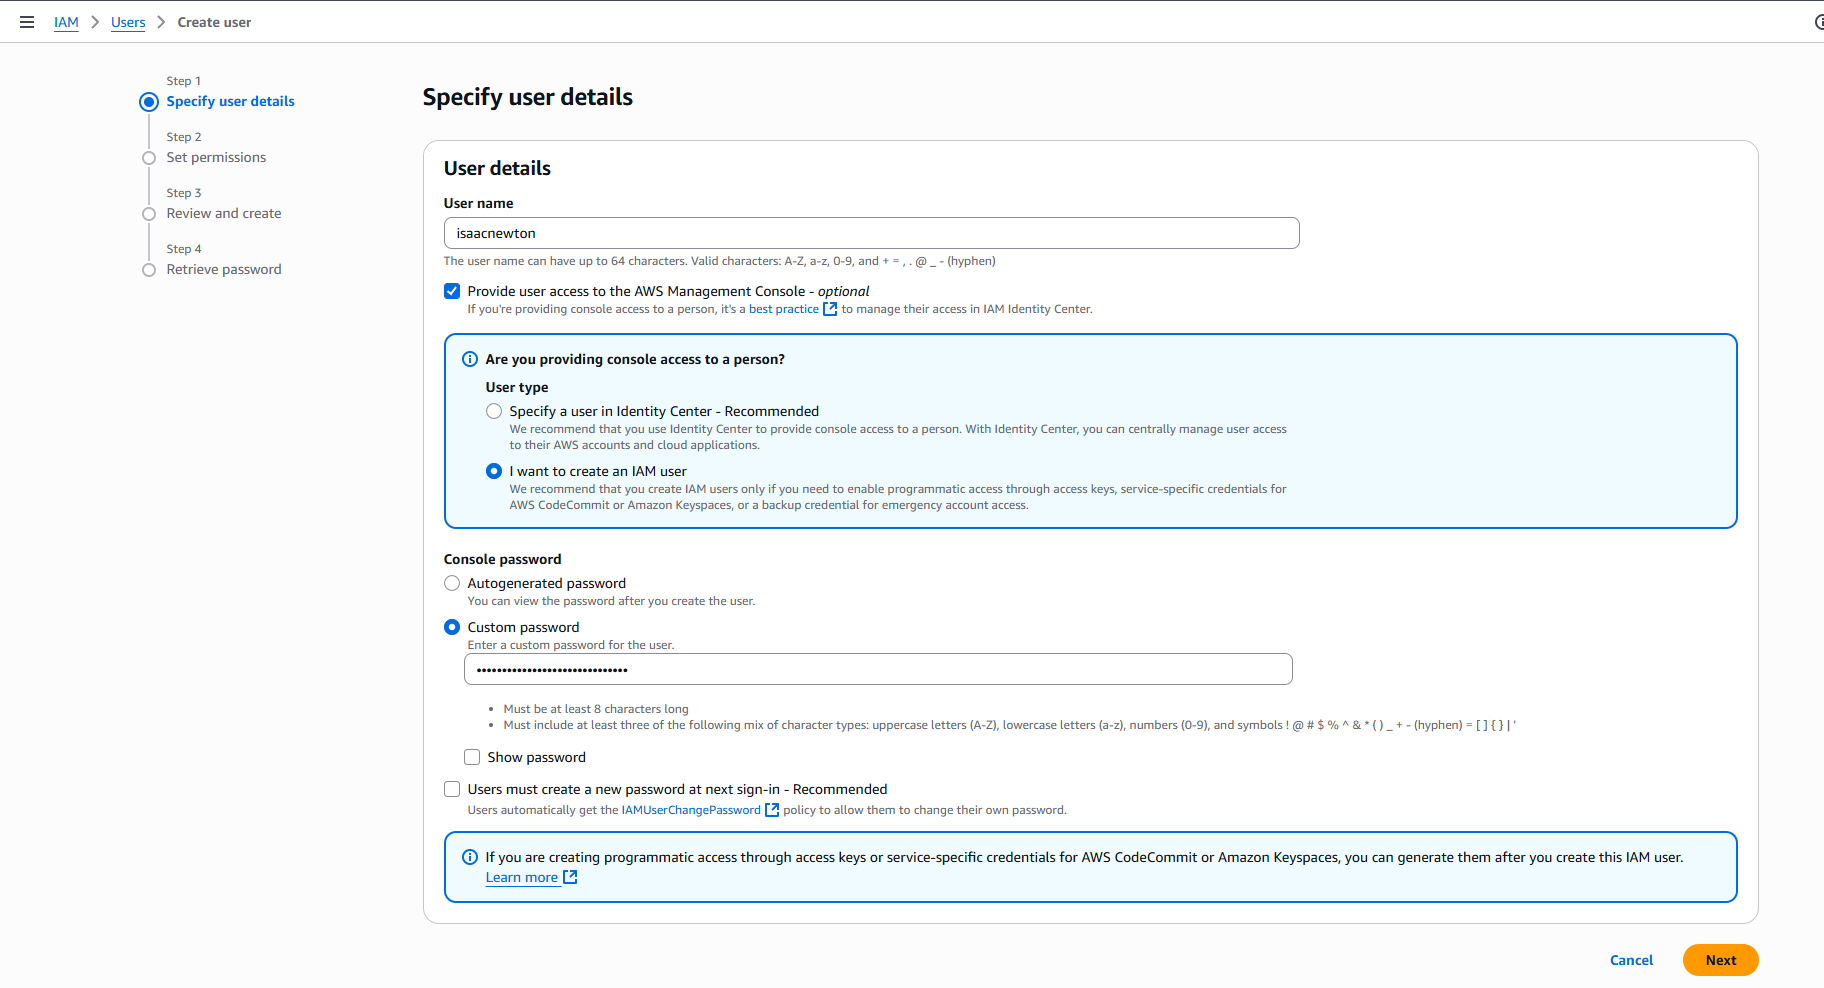
For Permissions you can “Attach policies directly” and just use the policy “AdministratorAccess”. You will be able to do everything with that user.
After creating the user go to
IAM > Users
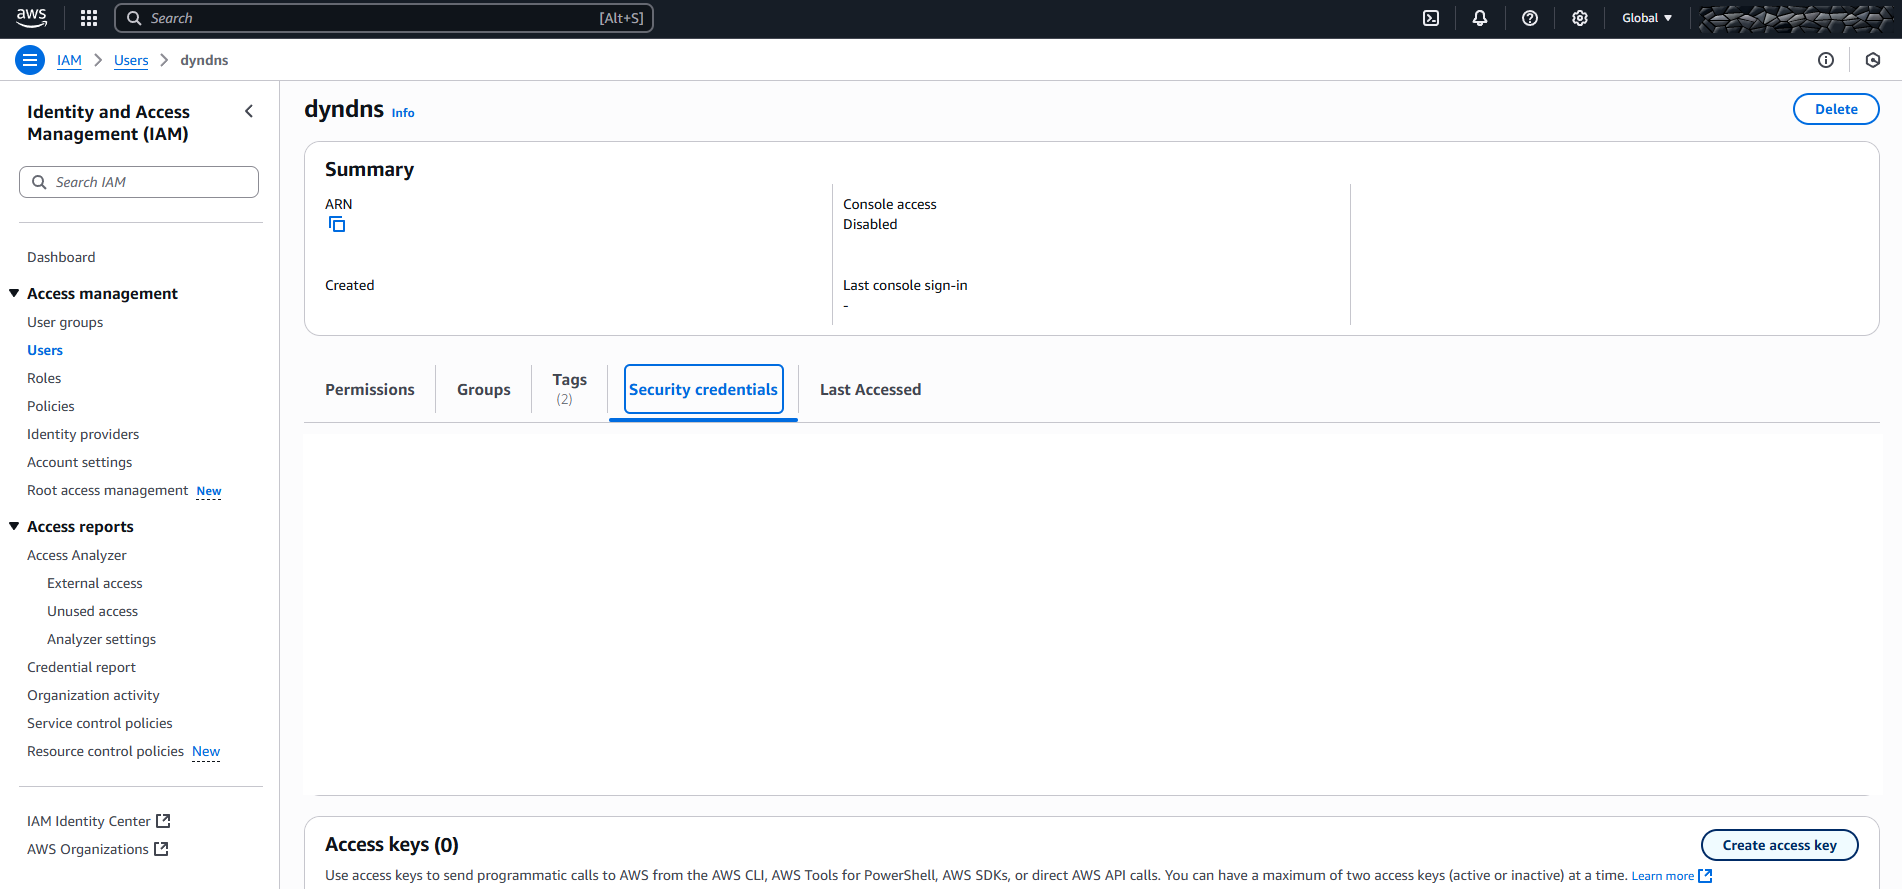
again, select the user from the list, go to the tab “Security credentials” and under “Multi-factor authentication (MFA)” click “Assign MFA device”.
Please follow this AWS documentation to enable MFA.
Finally login to your aws account with above created user (hopefully using e.g. your authenticator device).
Route53
Registration
When you finally have logged into the AWS console (“AWS console” is the name for the webinterface to amazon cloud stuff), we can register a domain and setup DNS.
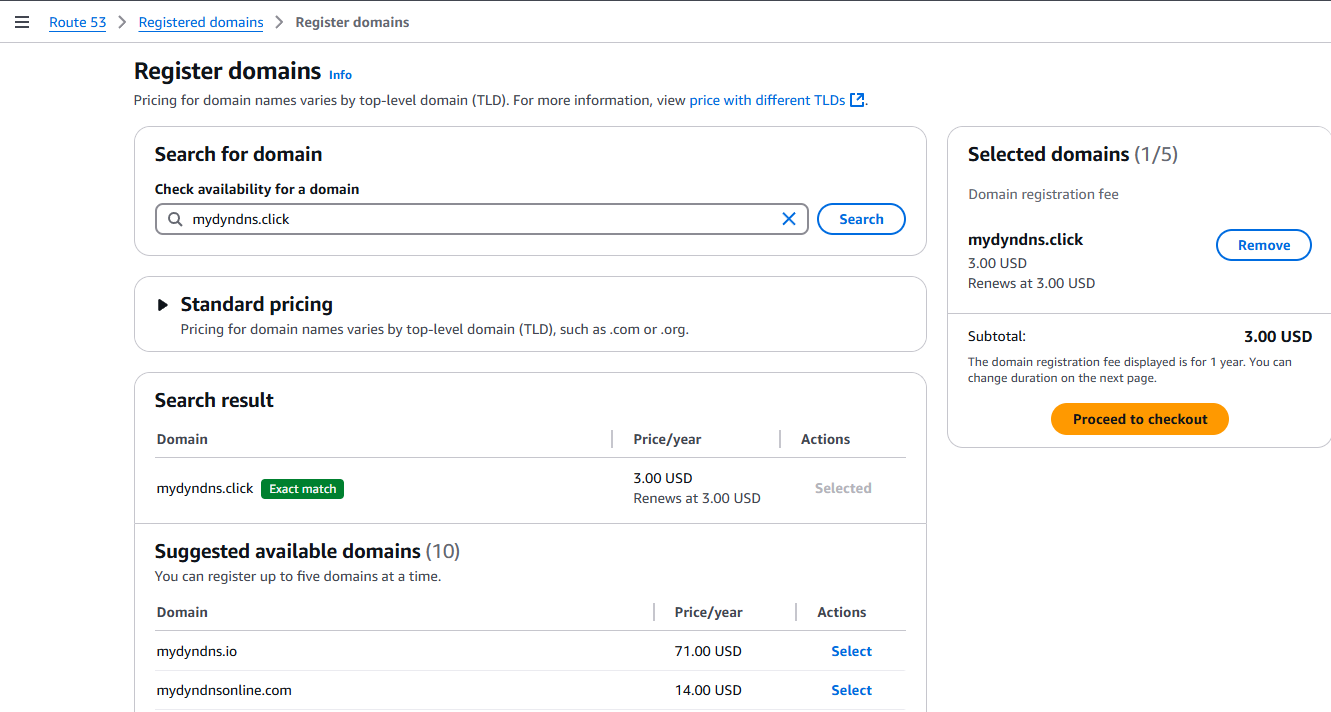
Go to AWS Services > Route 53 > Domains > Registered Domains, then click “Register Domains” on the right.
Now decide on a nice domain name (like e.g. “myname.click” if available), check if it is available, then click “Select” next to the domain and “Proceed to checkout”.
In the next dialog I would recommend using “Auto-renew” (it’s normally checked by default), just in case you forget to extend it manually.
In the next page enter your contact information (which is required for registered domains), verify that “Turn on privacy protection” is checked.
On the next page you can review and submit your request (accept the terms and hit “Submit”).
It can take a while until the registration process is finished.
Hosted Zone
AWS will automatically create the Hosted Zone (the area where the DNS entries subside).
You find it in AWS Services > Route 53 > Route 53 > Hosted zones
Click on the zone for your domain (if you do this the first time you should have only one)
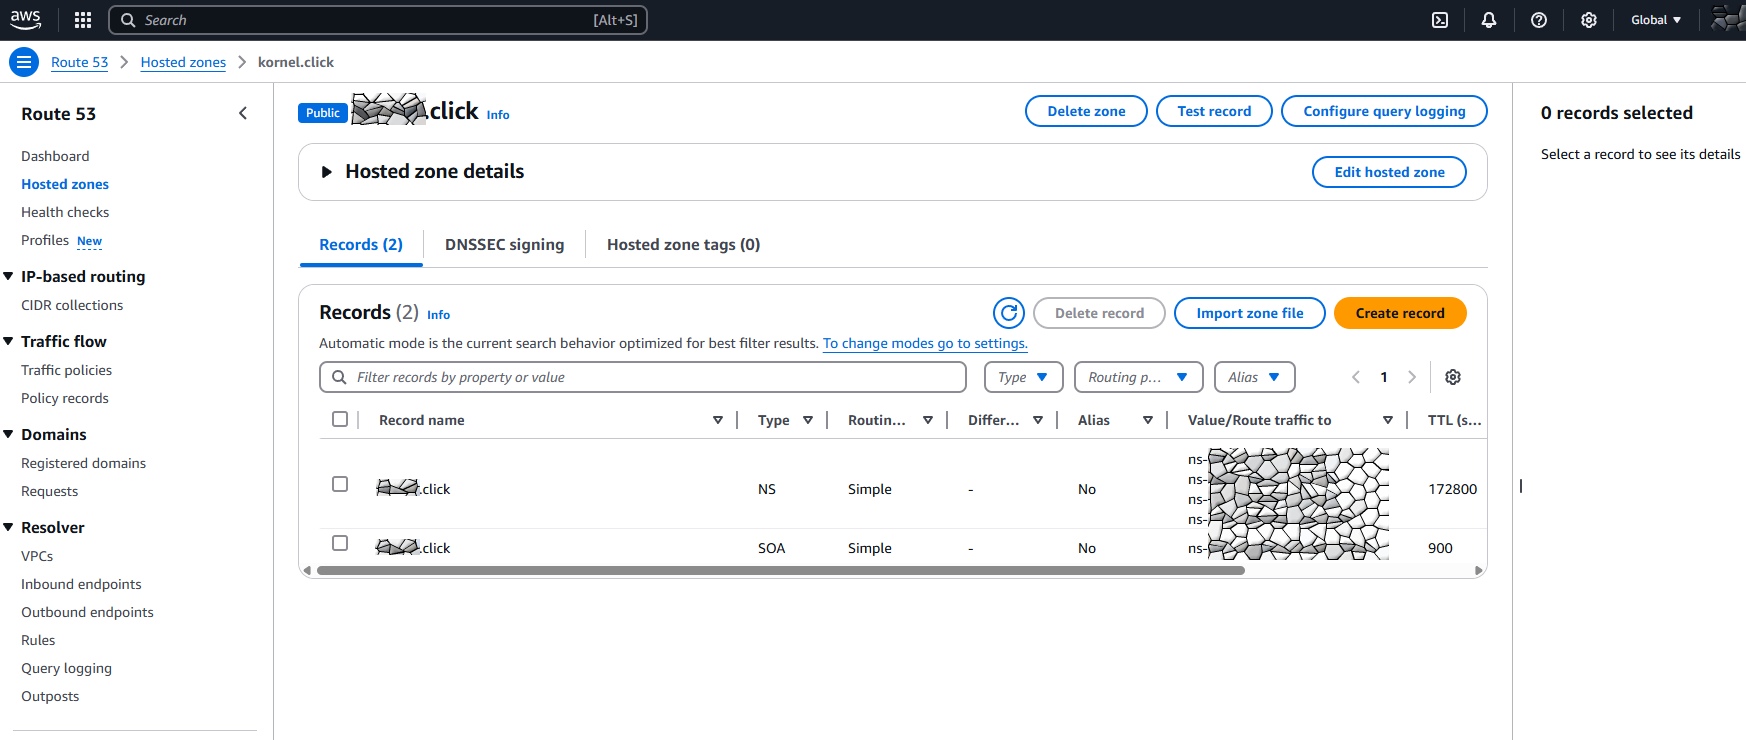
Click on “Create record” and let’s create our first DNS entry manually.
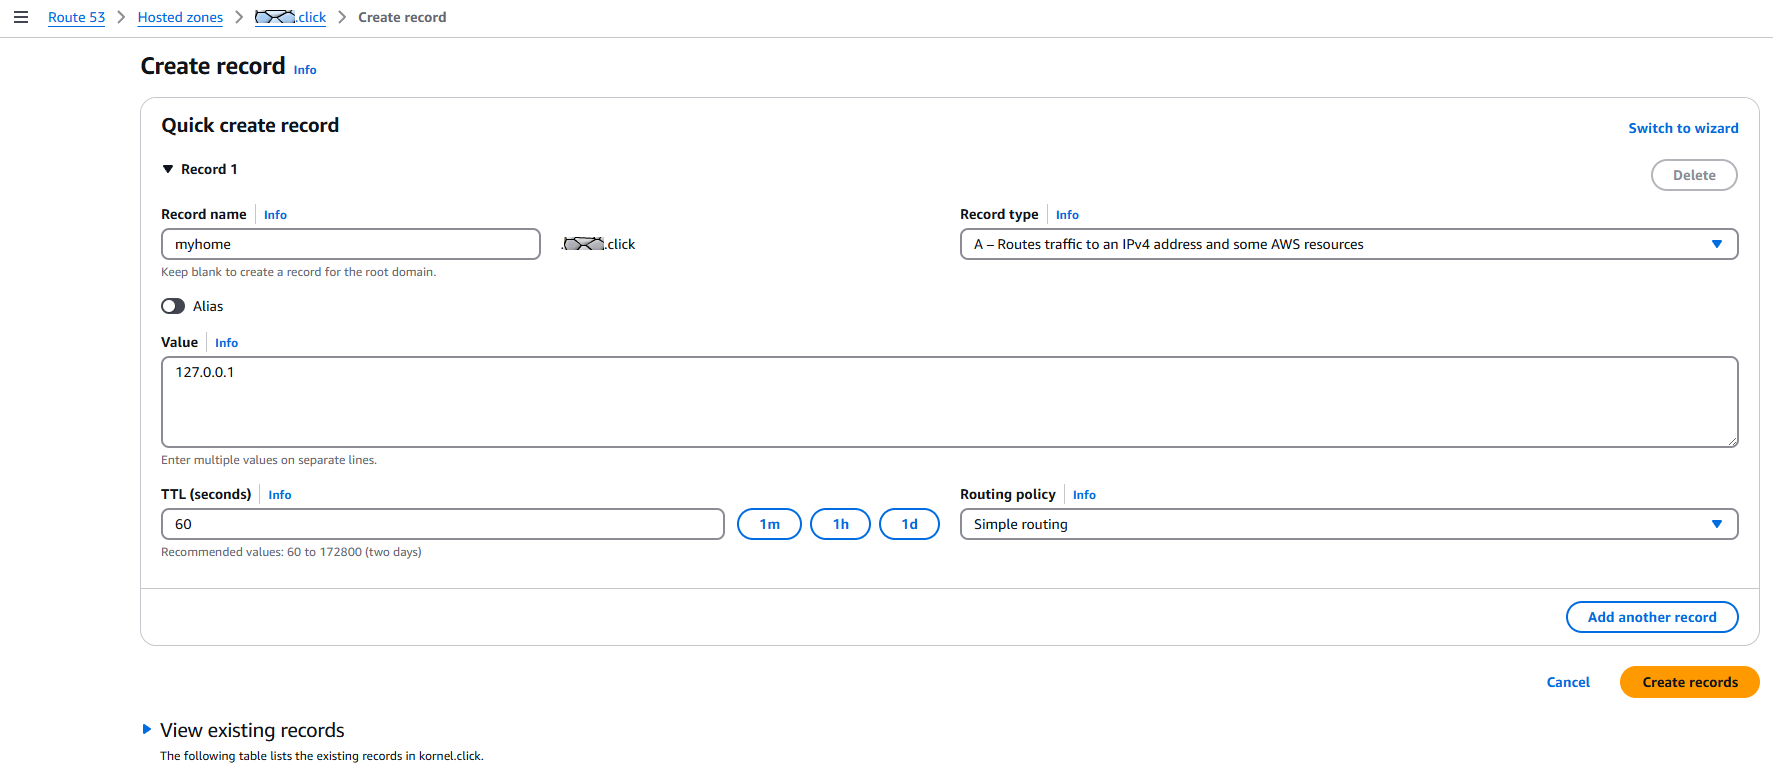
Choose a name for your DNS entry representing your home (or whatever) (e.g. “home”,“myhome”,“appliance”,…). Remember that name, we need it later for the policy and the script. I will use “myhome” in the following examples.
Background info: the full DNS path will look like “myhome.myname.click”, where “click” is the Top Level Domain “TLD, like .com or .de), “myname” would be the name of your domain (which is a subdomain of .click) and the “myhome” record, which points to an IP address (called an “A record”). myhome is a DNS entry in your domain. DNS is hierarchical and the hierarchy is read from right to left. The topmost domain is the rightmost entry. Entries are seperated by dots (.).
We need the full domain path for later (in the policy and the script). So please note it down somewhere.
The hosted zone after creation of the record:
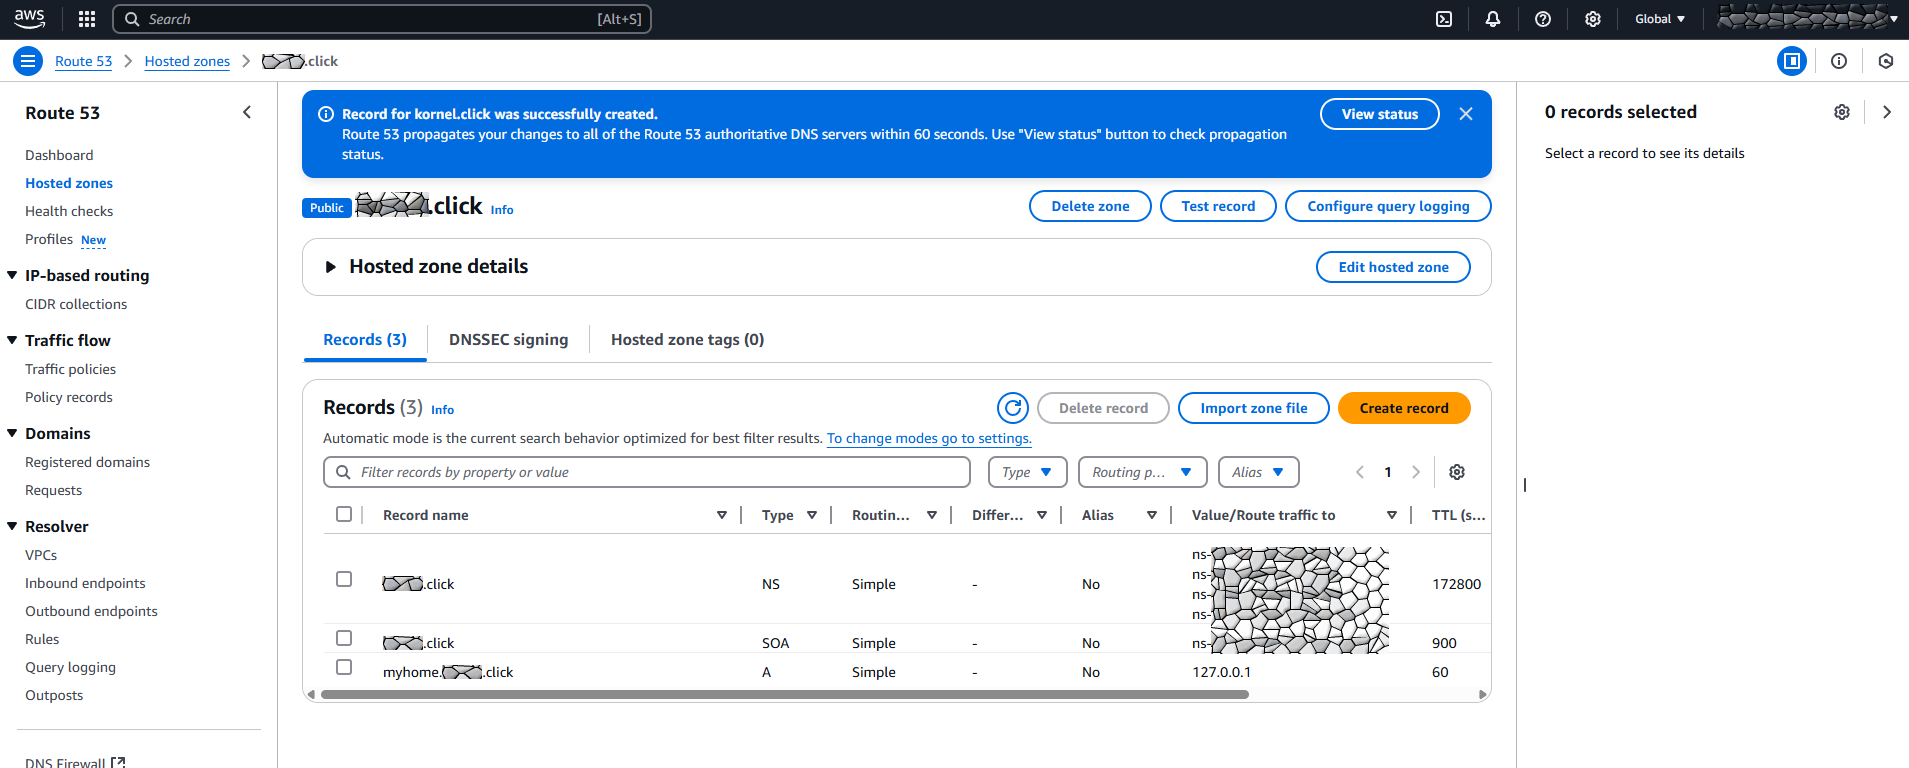
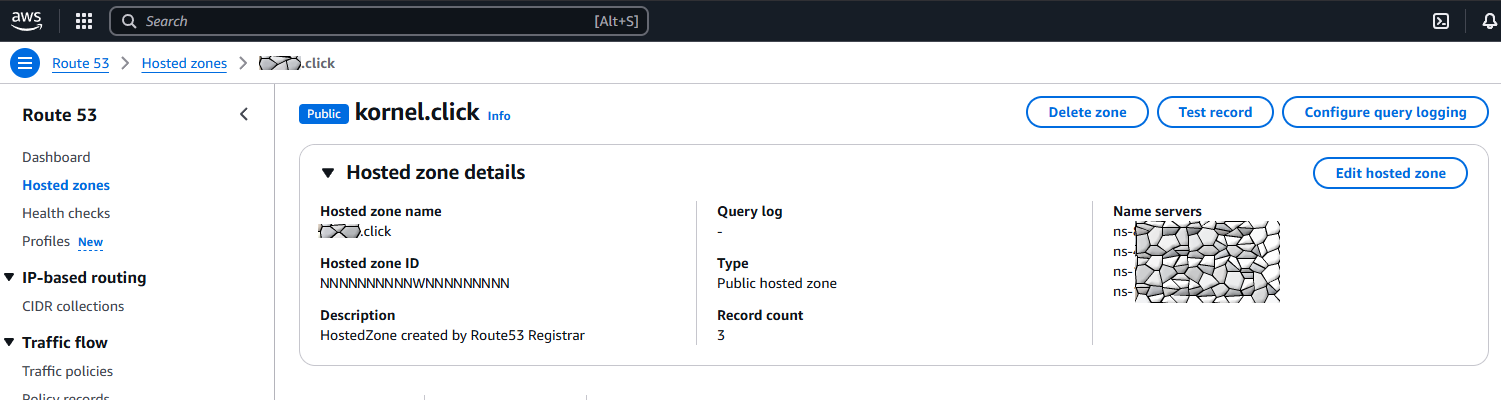
Expand “Hosted Zone Details”. We need to copy the “Hosted Zone ID” for the IAM Policy (save the ID under “Hosted Zone ID” (the NNN in the screenshot) somewhere 💾):
The next two things are the creation of an IAM User for programmatic use and the update bash script that will update above DNS record with the actual IP.
IAM User
IAM Policy
Go to AWS Services > IAM > Policies, and click “Create Policy” on the right.
On the Specify permissions page, select “JSON” (right of “Policy Editor”).
Paste the following policy into the editor
{
    "Version": "2012-10-17",
    "Statement": [
        {
            "Effect": "Allow",
            "Action": [
                "route53:ChangeResourceRecordSets"
            ],
            "Resource": "arn:aws:route53:::hostedzone/NNNNNNNNNNNNNNNNNNNN",
            "Condition": {
                "ForAllValues:StringEquals": {
                    "route53:ChangeResourceRecordSetsNormalizedRecordNames": [
                        "myhome.myname.click"
                    ],
                    "route53:ChangeResourceRecordSetsActions": [
                        "CREATE",
                        "UPSERT"
                    ]
                }
            }
        }
    ]
}
Change
- NNNNNNNNNNNNNNNNNNNN to the ID of your Hosted Zone ID
- myhome.myname.click to the full domain name you chose
Hit “Next”, then give your policy a name (like UpdateDynDns; again please remember the name for later) and hit “Create policy”.
IAM User
Now we need to create an IAM User with credentials that has above policy as permission, so we can update the DNS entry from a bash script.
Go to AWS Services > IAM > Users, click button “Create User”.
Pick a username (e.g. dyndnsupdater), do NOT click “Provide user access to the AWS Management Console”, the user should NOT have console access (only programmatic access), click “Next”. In the next dialog choose “Attach policies directly” and search for the policy created above (e.g. UpdateDynDns), click “Next”. On the final page review the data (like name, permission), add some tags if you want and click “Create user”.
Access key for programmatic access
Now lets go to our newly created user and create an Access Key for programmatic access (from the AWS CLI, aka command line interface).
Go to AWS Services > IAM > Users > click on the name of the user you created above (dyndnsupdater in our example).
Go to tab “Security credentials” and in the section “Access keys” click “Create access key”. Then select “Command line interface (CLI)”.
Check the confirmation box and hit “Next”.
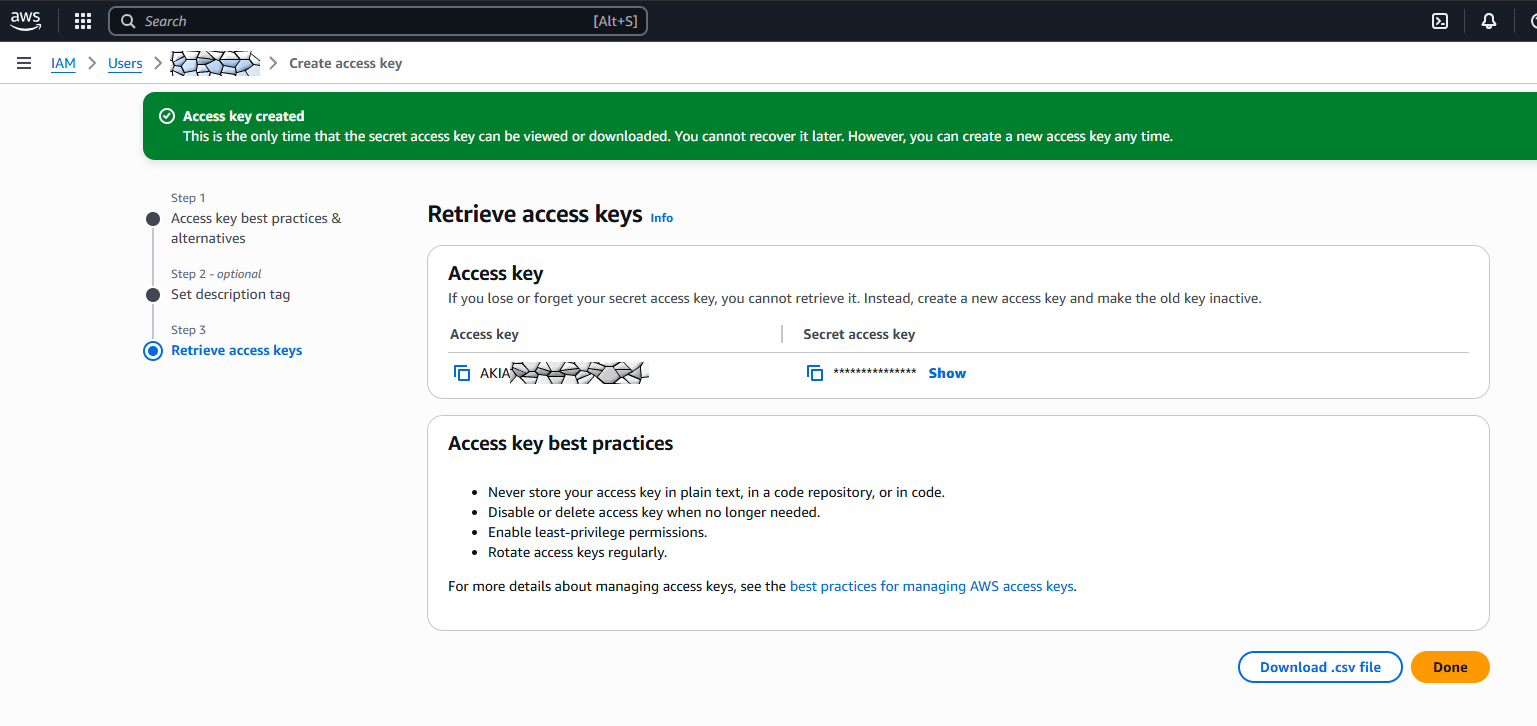
Optionally add a description for the access key and hit “Create access key”.
On the next page/dialog copy&paste the access key and the secret access key somewhere safe ( 💾 ).
Install aws cli
The following documentation is for a Linux distribution using bash. Perhaps I will follow up with a Windows solution some time. But this is it for now. Also feel free to change to any other shell or scripting language if you are proficient.
Note that the next steps are done on regular Linux distribution (the computer where you want to update the dns entry).
Best remove all AWS cli versions that come from distro packages, e.g.
$ sudo apt remove awscli   # dep/apt based systems
$ sudo snap remove aws-cli # ubuntu
$ sudo yum remove awscli   # rpm/yum based systems
$ sudo pacman -R awscli    # archlinux
[...]
As taken from https://docs.aws.amazon.com/cli/latest/userguide/getting-started-install.html you can just use
$ curl "https://awscli.amazonaws.com/awscli-exe-linux-x86_64.zip" -o "awscliv2.zip"
$ unzip awscliv2.zip
$ sudo ./aws/install
to install the aws cli.
configure the aws cli
For the actual Access Key/Secret Access Key please use the key you retrieved above 💾
You can either run
$ aws configure
AWS Access Key ID [None]: AKIAIOSFODNN7EXAMPLE
AWS Secret Access Key [None]: wJalrXUtnFEMI/K7MDENG/bPxRfiCYEXAMPLEKEY
Default region name [None]: us-east-1
Default output format [None]:
(change “us-east-1” to your preferred region. do not worry. you can override this by setting the environment variable AWS_REGION to whatever you need).
Or create the files manually
$ mkdir -p ~/.aws
$ /bin/cat <<EOM >.aws/config
[default]
region = eu-central-1
EOM

$ /bin/cat <<EOM >.aws/credentials
[default]
aws_access_key_id = AKIAIOSFODNN7EXAMPLE
aws_secret_access_key = wJalrXUtnFEMI/K7MDENG/bPxRfiCYEXAMPLEKEY
EOM
(do not even try to use above key. Google spat them out!)
Update-Script
The route53/hosted zone update is not a simple aws cli command but needs a JSON file for the request. We will create a template file, that the bash script will use to create the actual JSON file needed.
Let’s create a subdirectory called “update-dns” and then create the following files (with an editor of your choice:
$ mkdir update-dns
$ cd !$
- updateroute53-myhome.myname.click.json.template
{
            "Comment": "UPSERT myhome.myname.click",
            "Changes": [{
            "Action": "UPSERT",
                        "ResourceRecordSet": {
                                    "Name": "myhome.myname.click",
                                    "Type": "A",
                                    "TTL": 60,
                                 "ResourceRecords": [{ "Value": "XXX"}]
}}]
}
- updateroute53-myhome.myname.click.sh
#!/bin/bash
#set -x

cd ~/update-dns

new_ip=$(curl http://checkip.amazonaws.com/)
old_ip=$(host myhome.myname.click ns-123.awsdns-00.com  | grep "has address"  | awk '{print $NF}')

if [[ -z "$new_ip" ]]; then
        echo "new_ip is empty.aborting"
        exit 255
fi

if $( echo "$new_ip" | grep -qE '[0-9]+\.[0-9]+\.[0-9]+\.[0-9]+' ); then
        if [[ "$new_ip" != "$old_ip" ]]; then
                echo "Updating route53 entry for myhome.myname.click with new IP $new_ip (old ip is $old_ip)"
                sed "s/XXX/$new_ip/" updateroute53-myhome.myname.click.json.template  > updateroute53-myhome.myname.click.json
                aws route53 change-resource-record-sets --hosted-zone-id NNNNNNNNNNNNNNNNNNNN --change-batch file://updateroute53-myhome.myname.click.json
        fi
else
        echo "'$new_ip' is not a valid IP address.aborting"
fi
Replace the following:
- “myhome.myname.click” by your domain name
- “NNNNNNNNNNNNNNNNNNNN” by your hosted zone ID
- “ns-123.awsdns-00.com” by one of the nameservers of your hosted zone (they are in that NS area of your hosted zone in route53, see above screenshot)
You can also query the nameserver from the shell and pick one of them:
$ host -t ns myname.click
myname.click name server ns-123.awsdns-11.net.
myname.click name server ns-124.awsdns-12.org.
myname.click name server ns-125.awsdns-13.co.uk.
myname.click name server ns-126.awsdns-14.com.
Now make the script executable and let’s test it:
$ chmod 755 updateroute53-myhome.myname.click.sh
$ bash -x updateroute53-myhome.myname.click.sh
To see if this worked, you can query the amazon nameserver directly for the new entry: (again, replace myhome.myname.click by your domain and ns-123.awsdns-00.com by the nameserver you used above in the script). You can also look in the AWS console in route53 in your hosted zone is the IP changed.
$ host myhome.myname.click ns-123.awsdns-00.com
Cron Entry / Schedule the script
Last but not least create a cron entry to run this script every (e.g.) 6 minutes:
$ crontab -e

*/6 *  * * * /bin/bash ~/update-dns/updateroute53-myhome.myname.click.sh