How to Ssh Into Aws Ec2 Instance Without Opening Port 22
howto aws ssh
Premise
Normally if you want to ssh into your AWS EC2 (e.g Linux) Instance, you need that
- the EC2 Instance is in a public subnet, and
- the SecurityGroup has an Inbound Rule that opens port 22 to that instance
To keep that secure, you need to update the OS your instance regularly and perhaps even take more advanced measures for hardening your instance.
Instead there is an alternative method for connecting via ssh that does not require an open port 22 to that machine.
In short, the features to use are
- Session Manager from the AWS Systems Manager Service
- IAM User credentials
- aws cli (with ssm plugin) as a ProxyCommand for ssh
Prerequisites
You have
- access to an AWS account and permission to
- modify IAM (create roles, policies,users and keys)
- change EC2 settings (modify IAM Role of an instance)
- a remote linux machine to install aws cli and ssm plugin and use ssh
Requirements
- the EC2 Instance has an IAM Instance profile (a role) that includes a policy allowing
- AmazonSSMManagedInstanceCore and
- AmazonSSMPatchAssociation
- the EC2 Instance is running the AWS Systems Manager (SSM) agent (either use an AMI that includes the SSM agent or install manually)
- AWS IAM User with a policy allowing ssm:StartSession
- the (linux) computer you are connecting from has
- aws cli version 2 installed
- Session Manager (ssm) plugin for the AWS CLI installed
- for using the ssh command directly, you also need a ssh public key deployed to the target EC2 Instance
Mechanism
The mechanism works as follows:
In your shell, you run
$ ssh user@i-123412345
In your ssh config you have a ProxyCommand that will run the ssh session through the AWS Session manager (through the aws cli):
Host i-*

    ProxyCommand sh -c "aws --profile myssm ssm start-session \
        --target %h --document-name AWS-StartSSHSession --parameters 'portNumber=%p'"
This will create a ssh session through the aws cli. (You could of course just use “aws start-session” to create a ssh session, but the Proxycommand in the ssh config also allows you to do scp,sftp or rsync). Using ssh will also allow you to change the user (as with aws ssm start-session, this will always bring you to the user running the ssm-agent, e.g. “ssm-user”)
The AWS CLI will connect to the EC2 Instance via AWS Session Manager service. This will not need any actual ssh access to the EC2 Instance (you can close down inbound port 22).
The connection works because your IAM user is allowed to connect with the Session Manager through the aws cli.
Setup in Detail (AWS Console)
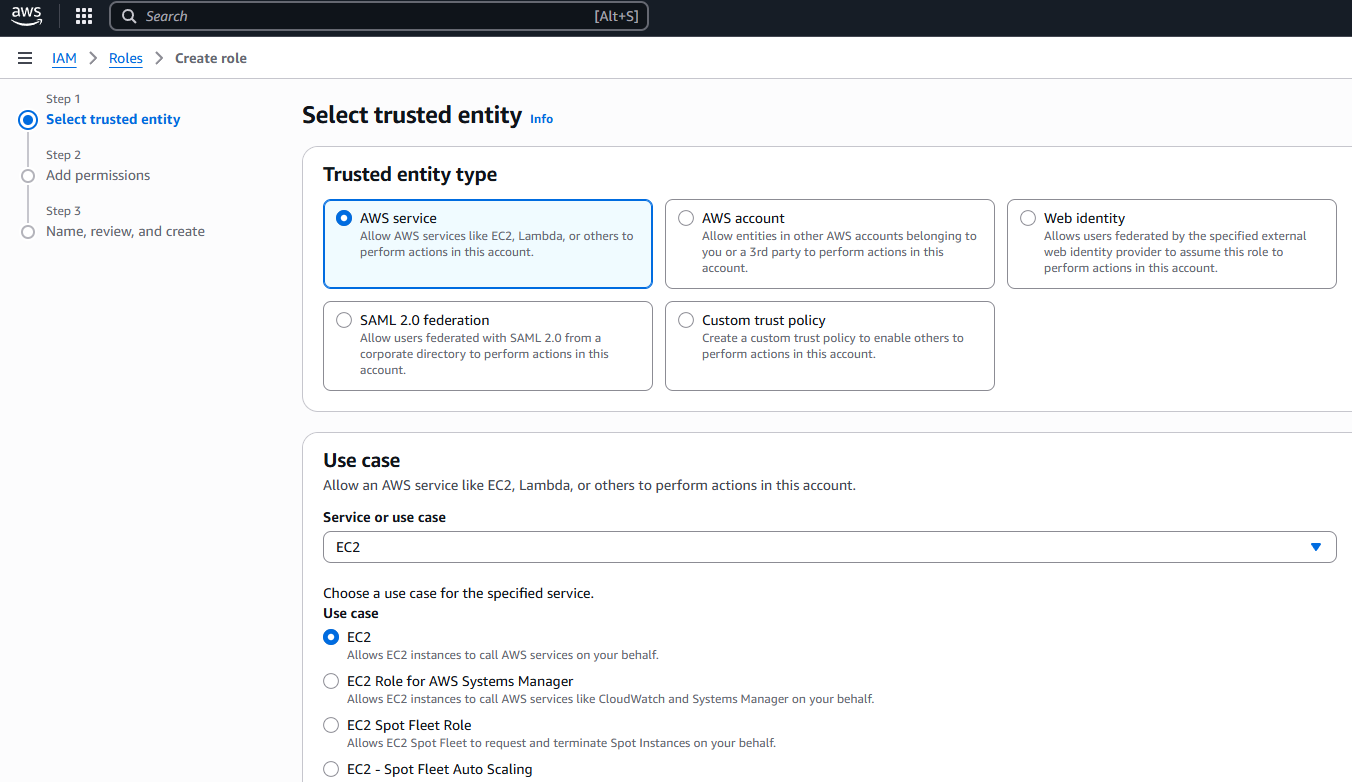
First create the IAM Instance Profile (role) for the EC2 Instance
AWS > IAM > Roles > Create Role
Choose “AWS Service” and Use Case “EC2 - Allows EC2 instances to call AWS services on your behalf.”
(this creates a role usable as an instance profile)
Attach at least (at least meaning: feel free to attach other permissions as needed for your use case) the following policies to that role
- AmazonSSMManagedInstanceCore
- AmazonSSMPatchAssociation
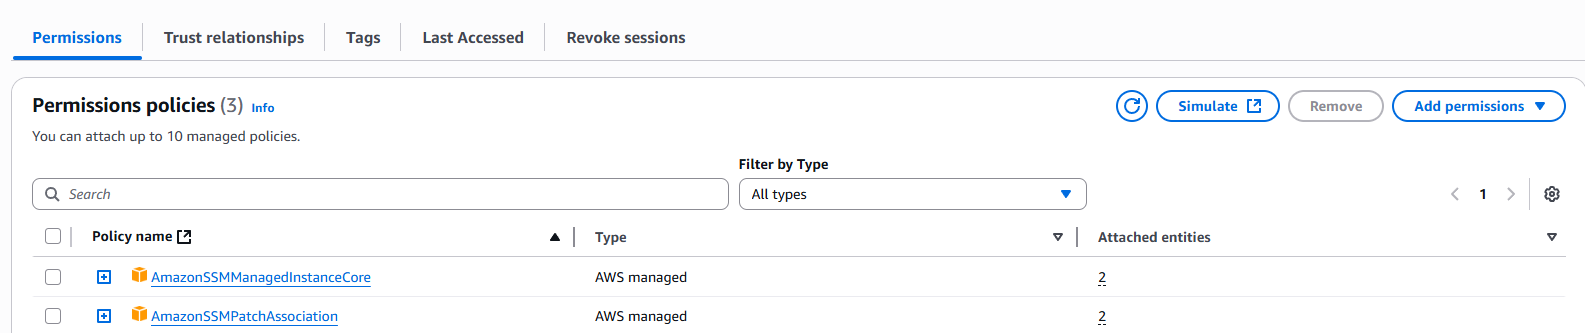
(as your instance can only have one role aka instance profile, you need to add all needed permissions/policies to this role)
EC2 Instance
AWS > EC2
Make sure the EC2 Instance has this Instance Profile/Role assigned (whatever you named the role above):
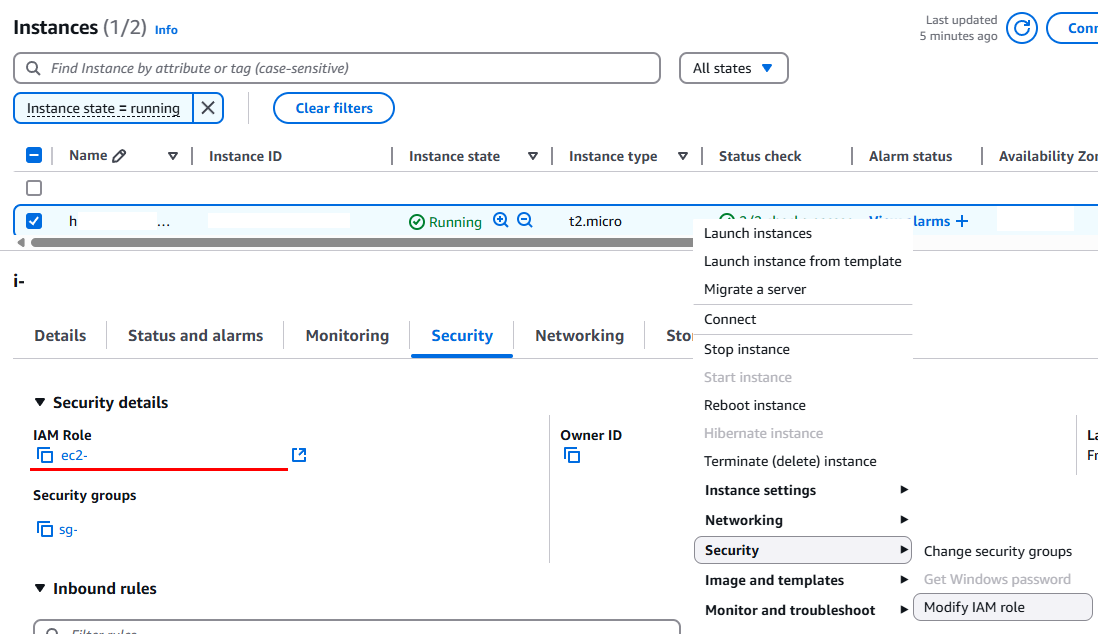
Explanation for this: The AWS EC2 Instance profile (IAM role) with the SSM permissions (IAM policies) allows access to the instance through Session Manager. The permissions are attached to the instance because the instance profile provides the necessary credentials for the SSM agent to communicate with the Session Manager service, allowing it to handle SSH connections and other operations.
SSM agent
(first you need to ssh into your EC2 Instance “the old fashioned way”)
Check if the AWS SSM agent (Systems Manager Agent) is running on your EC2 Instance
[ec2-user@myinstance ~]$ ps fuax | grep -i '[s]sm'
root   [...]    /usr/bin/amazon-ssm-agent
root   [...]        \_ /usr/bin/ssm-agent-worker

\# or

[ec2-user@myinstance ~]$ systemctl status amazon-ssm-agent.service
● amazon-ssm-agent.service - amazon-ssm-agent
     Loaded: loaded (/usr/lib/systemd/system/amazon-ssm-agent.service; enabled; preset: enabled)
     Active: **active** (running) since [...]
   Main PID: 2148 (amazon-ssm-agen)
      Tasks: [... a few irrelevant lines follow]
If it is not running you can follow the documentation here https://docs.aws.amazon.com/systems-manager/latest/userguide/manually-install-ssm-agent-linux.html
Example for CentOS based systems(x86_64):
sudo yum install -y https://s3.amazonaws.com/ec2-downloads-windows/SSMAgent/latest/linux_amd64/amazon-ssm-agent.rpm
Example for Ubuntu
$ sudo snap install amazon-ssm-agent --classic

$ sudo snap list amazon-ssm-agent

$ sudo snap start amazon-ssm-agent

# check if the service is running

$ sudo snap services amazon-ssm-agent
Example for Debian:
# for x86_64

$ wget https://s3.amazonaws.com/ec2-downloads-windows/SSMAgent/latest/debian_amd64/amazon-ssm-agent.deb

# for ARM64

$ wget https://s3.amazonaws.com/ec2-downloads-windows/SSMAgent/latest/debian_arm64/amazon-ssm-agent.deb

# then for both
$ sudo dpkg -i amazon-ssm-agent.deb

$ sudo systemctl enable amazon-ssm-agent

$ sudo systemctl start amazon-ssm-agent
Hint: it can take a few minutes until the SSM agent starts communicating with the AWS Systems Manager service.
Verify that SSM is working
You can use the AWS Console to verify access to the EC2 Instance via Session Manager:
AWS > AWS Systems Manager > Node Tools > Session Manager
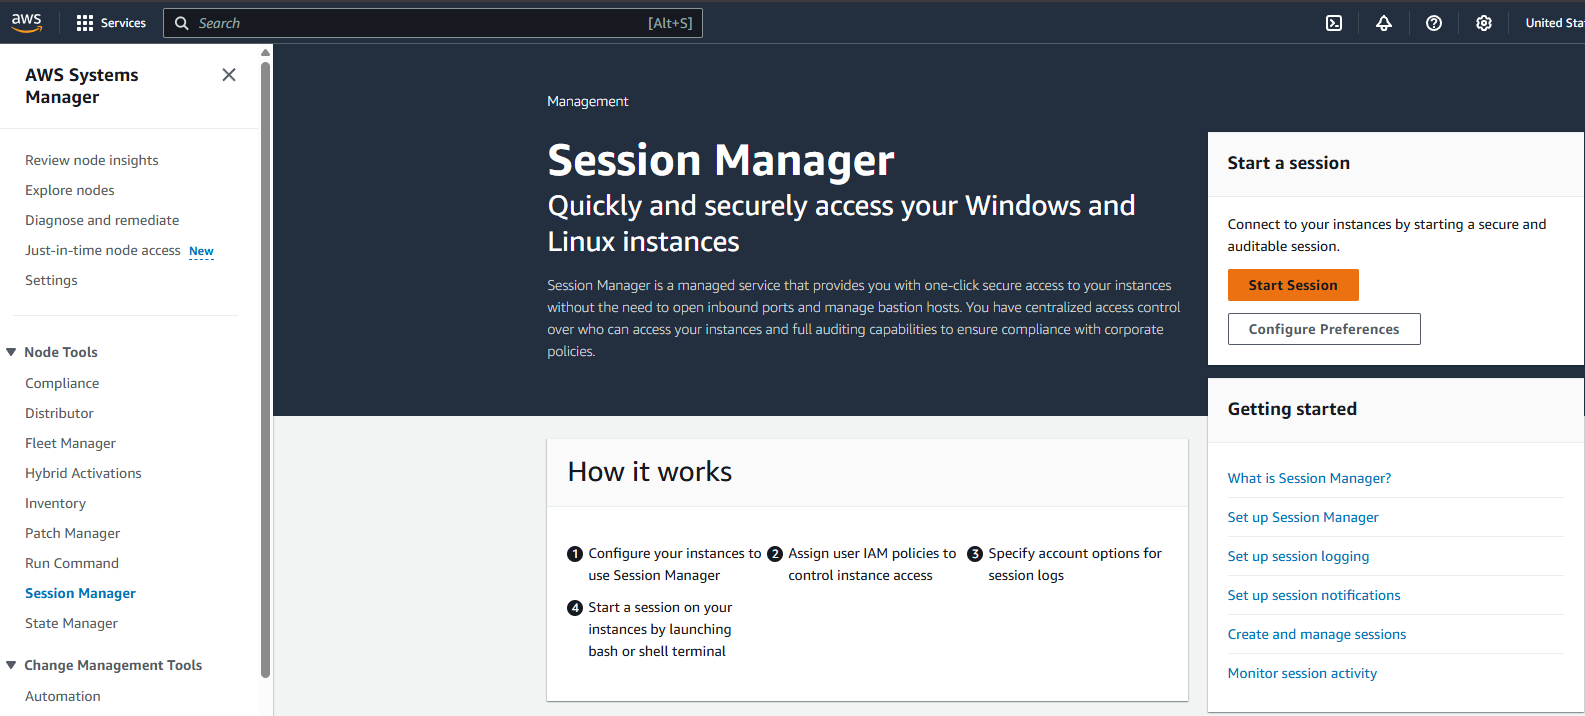
Start Session
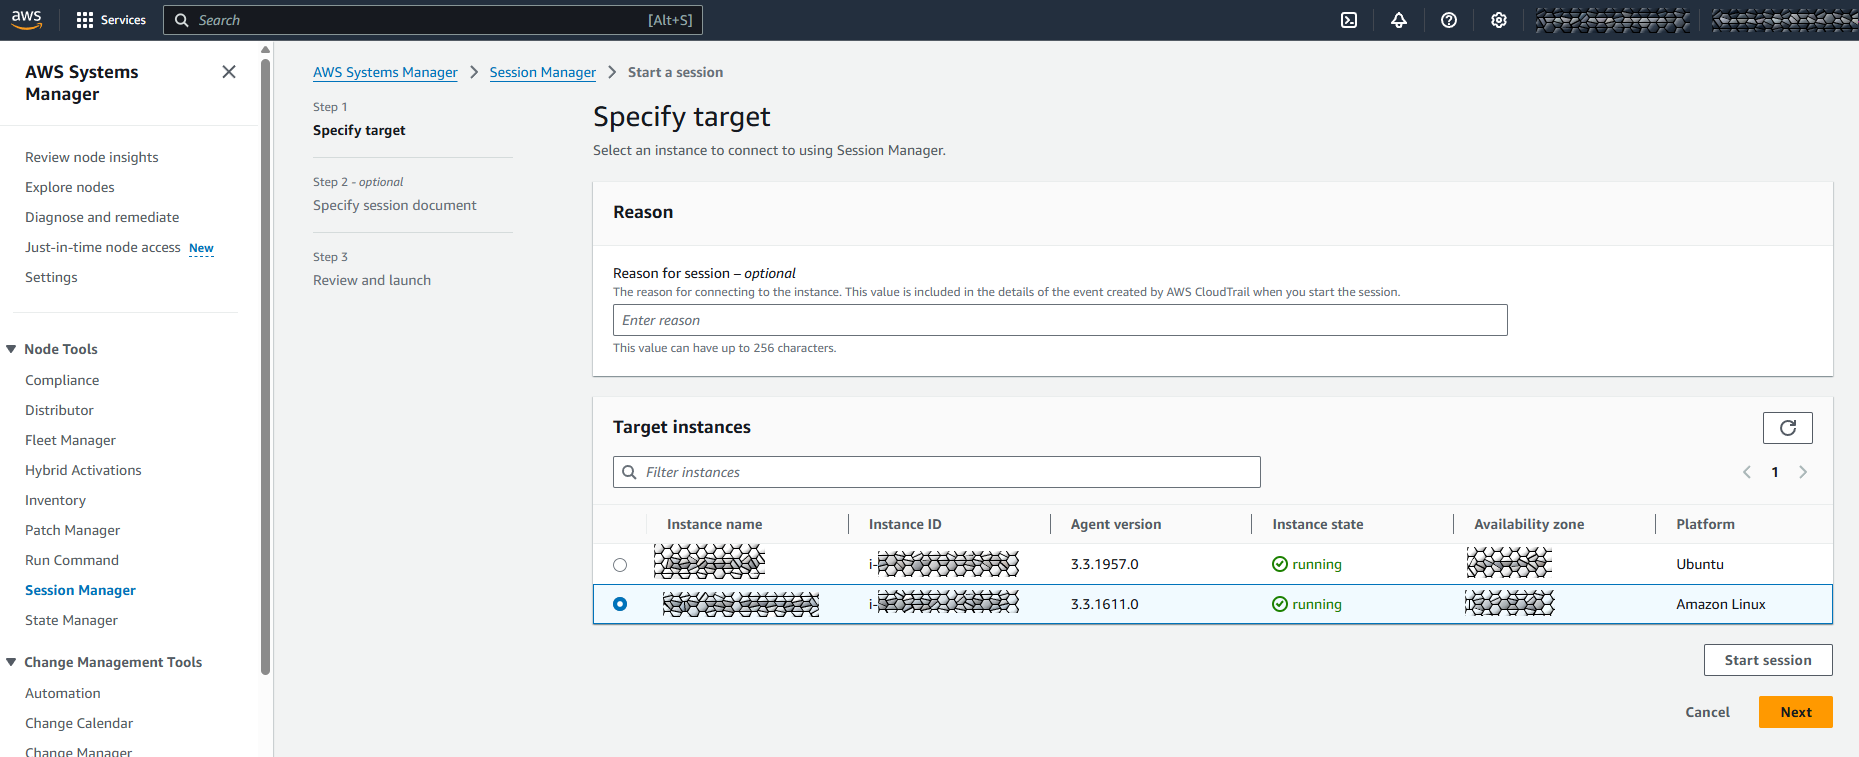
The EC2 Instance should be listed under “Target Instances”. Select it and click “Start session”. This will open a linux shell in your browser.

Create IAM User that is able to connect via SSM
Create SSM Policy
First create a policy that allows the connection via SSM
AWS IAM > Policies > Create Policy
Select JSON (on the right)
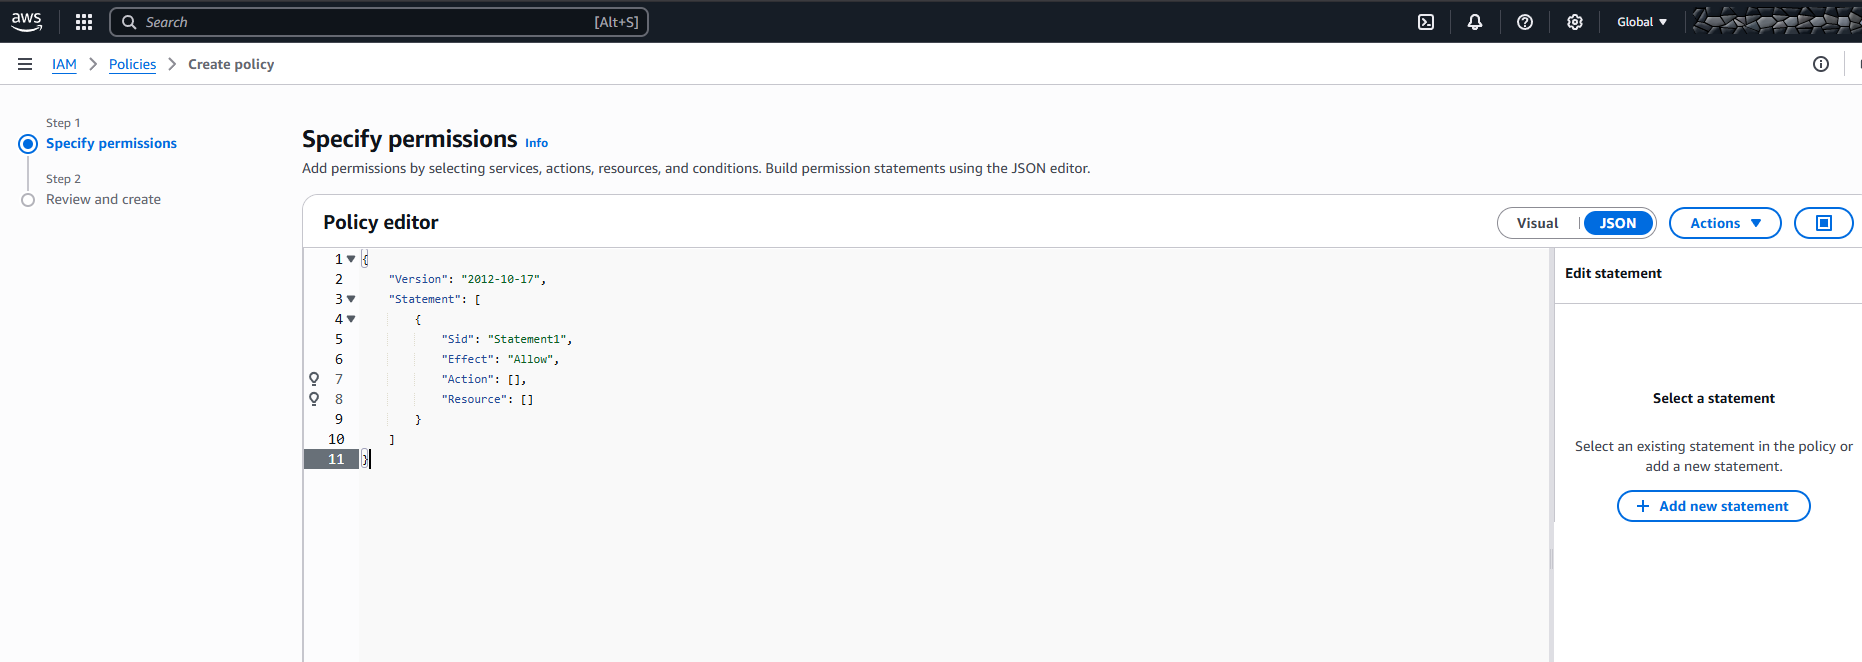
Paste the following permissions into the Policy editor:
{
    "Version": "2012-10-17",
    "Statement": [
        {
            "Effect": "Allow",
            "Action": [
                "ssm:StartSession"
            ],
            "Resource": [
                "*"
            ]
        },
        {
            "Effect": "Allow",
            "Action": [
                "ssm:DescribeSessions",
                "ssm:GetConnectionStatus",
                "ssm:DescribeInstanceProperties",
                "ec2:DescribeInstances"
            ],
            "Resource": "*"
        },
        {
            "Effect": "Allow",
            "Action": [
                "ssm:CreateDocument",
                "ssm:UpdateDocument",
                "ssm:GetDocument",
                "ssm:StartSession"
            ],
            "Resource": "arn:aws:ssm:*:*:document/SSM-SessionManagerRunShell"
        },
        {
            "Effect": "Allow",
            "Action": [
                "ssm:TerminateSession",
                "ssm:ResumeSession"
            ],
            "Resource": [
                "arn:aws:ssm:*:*:session/${aws:userid}-*"
            ]
        }
    ]
}
❗Note❗ that above policy also allows “ec2:DescribeInstances” which is quite helpful for debugging connection problems from the shell or find our instance details like e.g. IP address. This is not needed for the ssh connection and can be deleted (if you remove this line also remove the (then) trailing comma in the line above / ssm:DescribeInstanceProperties).
Give the policy a name and optionally a description. (remember the name)
Create IAM user with access credentials
Next create an IAM User using above policy:
AWS IAM > Users > Create User
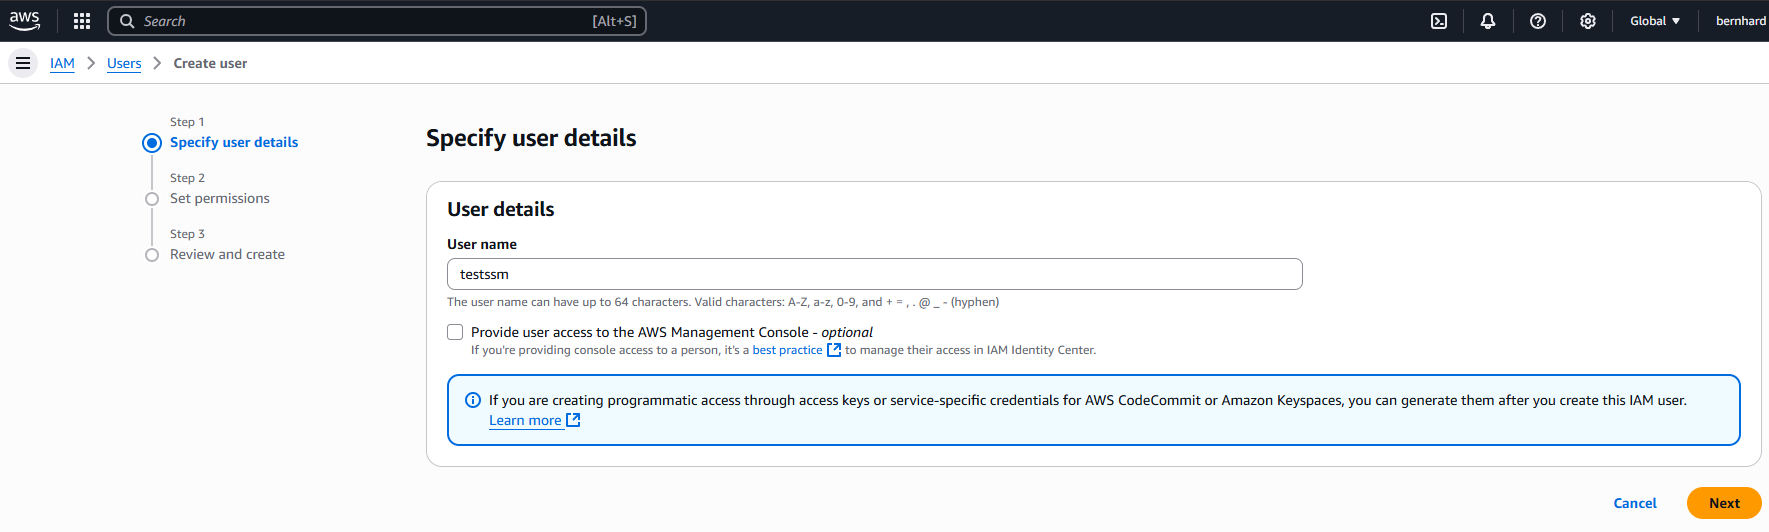
Do NOT check the box left to “Provide user access to the AWS Management Console” (the user should NOT have console web access)
Select “Attach policies directly”. Search for your policy and check it. Click next, review/verify the data (perhaps tag it) and hit “Create User”.
Hint: if you can not find your policy (perhaps you have created in parallel in another browser tab, hit the “refresh policies button”

Next, select the new user:
AWS > IAM > Users > click on the name of the user
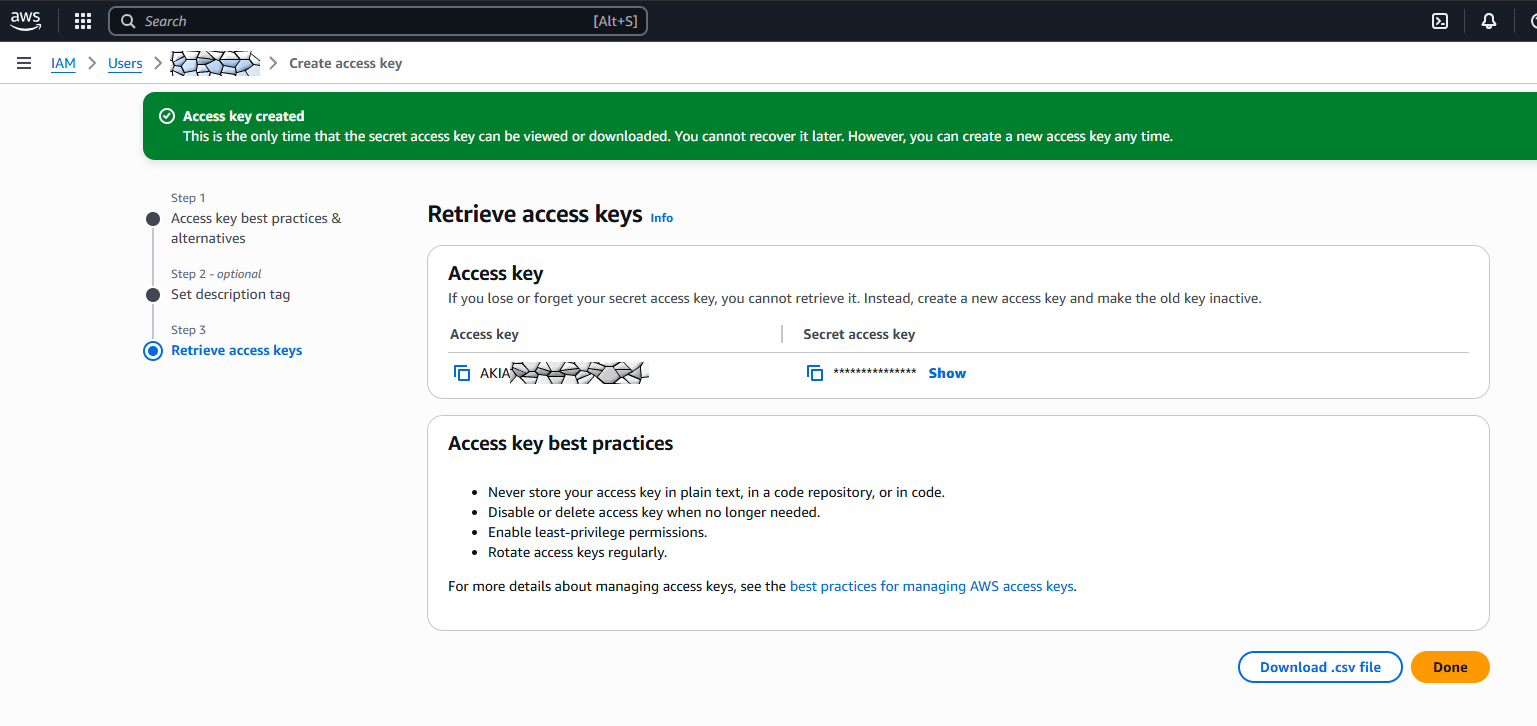
Go to tab “Security credentials” and in the section “Access keys” click “Create access key”. Then select “Command line interface (CLI)”.
Check the confirmation box and hit “Next”.
Optionally add a description for the access key and hit “Create access key”.
On the next page/dialog copy&paste the access key and the secret access key somewhere safe ( 💾 ).
Install aws cli version 2 and ssm plugin on the remote computer
Note that the next steps are done on the remote computer (e.g. your laptop, a VitualBox VM, a different cloud computer or any other linux machine you have).
Best remove all AWS cli versions that come from distro packages, e.g.
$ sudo apt remove awscli   # dep/apt based systems
$ sudo snap remove aws-cli # ubuntu
$ sudo yum remove awscli   # rpm/yum based systems
$ sudo pacman -R awscli    # archlinux
[...]
As taken from https://docs.aws.amazon.com/cli/latest/userguide/getting-started-install.html you can just use
$ curl "https://awscli.amazonaws.com/awscli-exe-linux-x86_64.zip" -o "awscliv2.zip"
$ unzip awscliv2.zip
$ sudo ./aws/install
to install the aws cli.
Next install the Session Manager plugin for the AWS CLI:
As taken from https://docs.aws.amazon.com/systems-manager/latest/userguide/session-manager-working-with-install-plugin.html
- https://docs.aws.amazon.com/systems-manager/latest/userguide/install-plugin-linux.html
- https://docs.aws.amazon.com/systems-manager/latest/userguide/install-plugin-debian-and-ubuntu.html
Redhat/CentOS bases Systems (x86_64):
$ sudo yum install -y https://s3.amazonaws.com/session-manager-downloads/plugin/latest/linux_64bit/session-manager-plugin.rpm
# or
$ sudo dnf install -y https://s3.amazonaws.com/session-manager-downloads/plugin/latest/linux_64bit/session-manager-plugin.rpm
Debian/Ubuntu (x86_64:
$ curl "https://s3.amazonaws.com/session-manager-downloads/plugin/latest/ubuntu_64bit/session-manager-plugin.deb" -o "session-manager-plugin.deb"
$ sudo dpkg -i session-manager-plugin.deb
configure the aws cli and test ssm connection
You can either run
$ aws configure
AWS Access Key ID [None]: AKIAIOSFODNN7EXAMPLE
AWS Secret Access Key [None]: wJalrXUtnFEMI/K7MDENG/bPxRfiCYEXAMPLEKEY
Default region name [None]: us-east-1
Default output format [None]:
(change “us-east-1” to your preferred region. do not worry. you can override this by setting the environment variable AWS_REGION to whatever you need).
Or create the files manually
$ mkdir -p ~/.aws
$ /bin/cat <<EOM >.aws/config
[default]
region = eu-central-1
EOM

$ /bin/cat <<EOM >.aws/credentials
[default]
aws_access_key_id = AKIAIOSFODNN7EXAMPLE
aws_secret_access_key = wJalrXUtnFEMI/K7MDENG/bPxRfiCYEXAMPLEKEY
EOM
(of course replace the key with the ones you saved above 💾)
(do not even try to use above key. Google spat them out!)
Now test the ssm connection
Let’s now test the ssm connection for the first time (directly using aws cli)
(replace “i-123412345” with the instance id of your EC2 Instance and “us-east-1” with your region.
~$ aws ssm start-session --target i-123412345 --region us-east-1
Starting session with SessionId: default-x79plf6u2hnlnqqlv9zic44kaq
sh-5.2$ id
uid=1001(ssm-user) gid=1001(ssm-user) groups=1001(ssm-user) context=system_u:system_r:unconfined_service_t:s0
ssh configuration and key deployment
Create a ssh key pair if you do not have one (let’s use fancy elliptic curves)
$ ssh-keygen -t ed25519
Generating public/private ed25519 key pair.
Enter file in which to save the key (/home/user/.ssh/id_ed25519):
Created directory '/home/user/.ssh'.
Enter passphrase (empty for no passphrase):
Enter same passphrase again:
Your identification has been saved in /home/user/.ssh/id_ed25519
Your public key has been saved in /home/user/.ssh/id_ed25519.pub
The key fingerprint is:
SHA256:N2qQpracxk38Q41T7T7NaSug0Zov8UBXCCVm36w75Pw user@localmachine
The key's randomart image is:
+--[ED25519 256]--+
|        =o..     |
|       o o.o.    |
|          .oo    |
|       .. o..    |
|   .oo ooX=o o . |
|   ooo..B .o+ =  |
|   .+    +. E+.. |
+----[SHA256]-----+
The public key will look like:
$ cat .ssh/id_ed25519.pub
ssh-ed25519 AAAAC3NzaC1lZDI1NTE5AAAAIMzlrlFVntD2PHpPWqrxxxxxxxK1imQElESpXGLdJCF1 user@mymachine
You can copy the public key to the remote machine using the aws cli:
Note: The “export AWS_PROFILE” command below is only needed if your aws config has a different region configured (replace “us-east-1” by your region).
$ export AWS_PROFILE="us-east-1"
$ aws ssm send-command --instance-ids <instance-id> --document-name "AWS-RunShellScript" --parameters 'commands=["echo <insert public ssh key here> >> ~/.ssh/authorized_keys"]' --comment "uploading ssh key"

Example:

$ aws ssm send-command --instance-ids i-123412345 --document-name "AWS-RunShellScript" --parameters 'commands=["echo ssh-ed25519 AAAAC3NzaC1lZDI1NTE5AAAAIMzlrlFVntD2PHpPWqrxxxxxxxK1imQElESpXGLdJCF1 user@mymachine >> >> ~/.ssh/authorized_keys"]' --comment "uploading ssh key
This will append the key to the authorized_keys file of the user running the SSM daemon, usually ssm-user. If you want to add the key to another user, you have to ssh into the machine and copy the key manually to the home of the other user (or use some elaborate sudo tricks).
Add the following lines to your (local) ssh config file (usually ~/.ssh/config)
Host i-*

    ProxyCommand sh -c "aws --profile default ssm start-session \
        --target %h --document-name AWS-StartSSHSession --parameters 'portNumber=%p'"
(if you use a different “section” (profile) in your aws config, replace “default” by the correct profile)
Now you should finally be able to actually ssh into the machine:
(Replace “us-east-1” by your region.)
user@localmachine:~$ export AWS_REGION=us-east-1
user@localmachine:~$ ssh ssm-user@i-123412345
The authenticity of host 'i-123412345 ()' can't be established.
ED25519 key fingerprint is SHA256:xxxxxxxxxxxxxxxxxxxxxxxxxxxxxxxx.
Are you sure you want to continue connecting (yes/no/[fingerprint])? yes
Warning: Permanently added 'i-123412345' (ED25519) to the list of known hosts.
&nsbp;
   ,     #_
   ~\_  ####_        Amazon Linux 2023
  ~~  \_#####\
  ~~     \###|
  ~~       \#/ ___   https://aws.amazon.com/linux/amazon-linux-2023
   ~~       V~' '->
    ~~~         /
      ~~._.   _/
         _/ _/
       _/m/'
Bonus: How to query EC2 metadata from within the instance
For Amazon Linux you can run (in the shell on your instance)
$ ec2-metadata
$ ec2-metadata -i  # will give you only the instance id
which will dump a lot of metadata (instance-id, region, …) for your EC2 Instance.
For other AMIs you alternatively use
$ wget -q -O - http://169.254.169.254/latest/meta-data/
$ wget -q -O - http://169.254.169.254/latest/meta-data/instance-id # will give you only the instance id