Start Ec2 Instance via Lambda Url
howto aws ec2 start lambda otp
Premise
Imagine you need a “noob” way to let someone start an AWS EC2 Instance, but
- you do not want them aws console access
- they can not really manage aws cli
Why not have a AWS Lambda function that is allowed exactly to start that particular EC2 Instance, and nothing else?
Since we can invoke an AWS Lambda function via URL without an API Gateway for some time now, that is really neat.
BUT, everybody with that URL can then execute the lambda function! Even if we add a password in the URL, that would not make a difference.
Yes, but we can use python otp (one time password) and the google authenticator app to use temporary one time passwords!
The only thing our “noob” user needs now is the URL, google authenticator and the ability to add a number to the URL.
So let’s view the whole setup.
Prerequisites
Let’s assume you already have an AWS EC2 Instance that you want to start via URL. You would need
- access to AWS IAM and permission to create policies and roles
- access to AWS Lambda to create a Lambda Layer and a function
- access to AWS Cloudwatch to see any debug output
- any linux machine to create the AWS Lambda layer zip file (containing python-otp)
Setup in detail (aws console)
IAM Policies
Go to AWS > Services > IAM > Policies and click button “Create Policy” on the right.
Next to “Policy Editor” click “JSON” and paste the following policy into the box:
{
    "Version": "2012-10-17",
    "Statement": [
        {
            "Effect": "Allow",
            "Action": "logs:CreateLogGroup",
            "Resource": "arn:aws:logs:us-east-1:1234567890123:*"
        },
        {
            "Effect": "Allow",
            "Action": [
                "logs:CreateLogStream",
                "logs:PutLogEvents"
            ],
            "Resource": [
                "arn:aws:logs:us-east-1:1234567890123:log-group:/aws/lambda/startMyServer:*"
            ]
        }
    ]
}
Replace
- us-east-1 by the region you are using (easiest to run the lambda function in the same region as the EC2 Instance)
- 1234567890123 by your account ID (you find that in the top-right in the AWS Console, but use no dashes)
- (of course feel free to change the name “startMyServer” here and in the following document)
Hit “Next”; On the next page give the policy a good name (e.g. “lambda-execution-policy-for-startMyServer-log-creation”). Optionally (but highly recommended) add some tags (e.g. “owner” -> “Horst” or “purpose” -> “startMyServerViaURL”). (With the tags you can easily find all resources related to this setup).
Then click “Create Policy”.
We need another policy for the actually allowing the lambda function to start the EC2 Instance (let’s have 2 seperate policies, perhaps you want to reuse the 2nd one).
Repeat above steps but this time use the following policy
{
    "Version": "2012-10-17",
    "Statement": [
        {
            "Effect": "Allow",
            "Action": [
                "ec2:StartInstances"
            ],
            "Resource": "arn:aws:ec2:us-east-1:*:instance/*",
            "Condition": {
                "StringEquals": {
                    "aws:ResourceTag/StartViaLambda": "yes"
                }
            }
        }
    ]
}
Again replace
- us-east-1 by your region
This policy will allow starting all EC2 Instances in region “us-east-1” that have the tag “StartViaLambda” with the value “yes”.
If you would like to expand the policy a bit, to e.g. also stop the instance or describe the instances in your region, you could use this policy instead
{
    "Version": "2012-10-17",
    "Statement": [
        {
            "Effect": "Allow",
            "Action": [
                "ec2:StartInstances",
                "ec2:StopInstances"
            ],
            "Resource": "arn:aws:ec2:us-east-1:*:instance/*",
            "Condition": {
                "StringEquals": {
                    "aws:ResourceTag/StartViaLambda": "yes"
                }
            }
        },
        {
            "Effect": "Allow",
            "Action": [
                "ec2:DescribeInstances",
                "ec2:DescribeInstanceStatus"
            ],
            "Resource": "*"
        }
    ]
}
IAM Role
Next we need to create the Execution Role for the Lambda Function using above 2 policies:
Go to AWS > Services > IAM > Roles and click “Create Role” on the right.
Entity Type is “AWS Service” and from the “Service or use case” select “Lambda”.
Search for your policies (the names you used above and/or filter by Type “Customer managed”) and check the 2 policies from above.
Click “Next”, give the Role a meaningful name (💾 remember the name for later)(e.g. StartMyServerLambdaExecutionRole), optionally add the tags you used in the policy above and click “Create Role”.
Now we have everything we need to create the Lambda function.
Python-OTP Lamba Layer
Since pyotp is not included in our AWS Lambda python environment by default, we need to create the Python Lambda Layer As a Zip File.
For this login to your linux machine (we are going to do Ubuntu and Python 3.10, should work for other distros and other python versions as well). (But please check AWS Lambda for available Python runtime environments. If you create the Lambda Layer with Python 3.13 but the highest runtime environment available in AWS Lambda would be 3.12 it will probably not work)
Prerequisites
- Python 3.10 installed
- pip installed (python package manager)
- python3.10-venv installed
Create working directory
$ mkdir aws-lambda-project
$ cd aws-lambda-project
Create and activate virtual environment
/aws-lambda-project $ python3.10 -m venv virtualenv
/aws-lambda-project $ source virtualenv/bin/activate
Install and freeze dependencies
(virtualenv) /aws-lambda-project $ pip install pyotp #  (could perhaps also be pip3 install)
(virtualenv) /aws-lambda-project $ pip freeze > requirements.txt
Prepare and compress the Lambda layer
(virtualenv) /aws-lambda-project $ mkdir -p lambda_layer/python/lib/python3.10/site-packages
(virtualenv) /aws-lambda-project $ pip install -r requirements.txt -t lambda_layer/python/lib/python3.10/site-packages
(virtualenv) /aws-lambda-project $ cd lambda_layer
(virtualenv) /aws-lambda-project/lambda_layer/ $ zip -r lambda_layer.zip .
(you might want to leave the virtualenv with “deactivate”)
Upload the Lambda Layer in AWS Console
Go to AWS > Services > Lambda > (Under Additional Resources) Layers, click “Create Layer” on the right.
Give the Layer a meaningful name (e.g. pythonOTPLayer), click “Choose file” and select the above created zip file (lambda_layer.zip). Under “Compatible runtimes”, select “Python 3.10” (or adapt if you used a different python version).
Note: The python runtime of your lambda function should match the python version you used above to create the Lambda Layer file.
We can now create the Lambda function itself.
Lambda Function
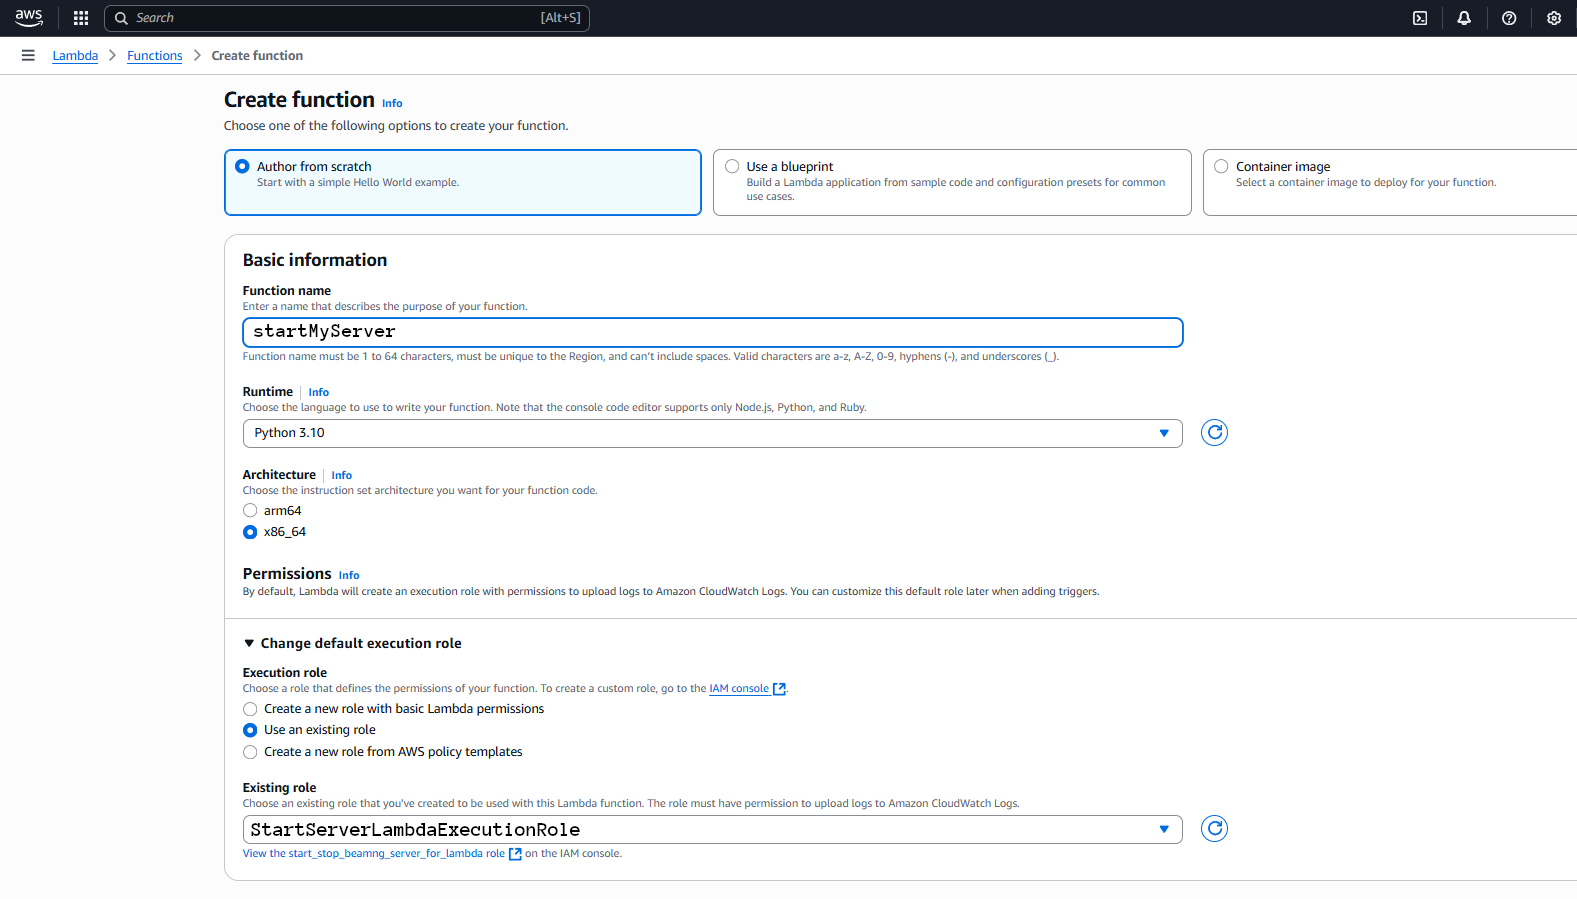
Go to AWS > Services > Lambda > Functions, click “Create function” on the right.
We want “Author from scratch”. Give it a meaningful name (e.g. startMyServer).
Hint: I recommend using the same name as in the first policy, line “arn:aws:logs:us-east-1:1234567890123:log-group:/aws/lambda/startMyServer:*”
Runtime should be Python 3.10 (or whatever you used above for the Lambda Layer).
Under “Change default execution role”, select “Use an existing role” and select the IAM Role we created above (💾)
Under “Additional configurations”, again under “Enable function URL” check the box next “Use function URLs to assign HTTP(S) endpoints to your Lambda function.”,
for “Auth type” select “NONE” (leave the policy statement as it is). We can ignore the warning because we will use the OneTimePassword within our function.
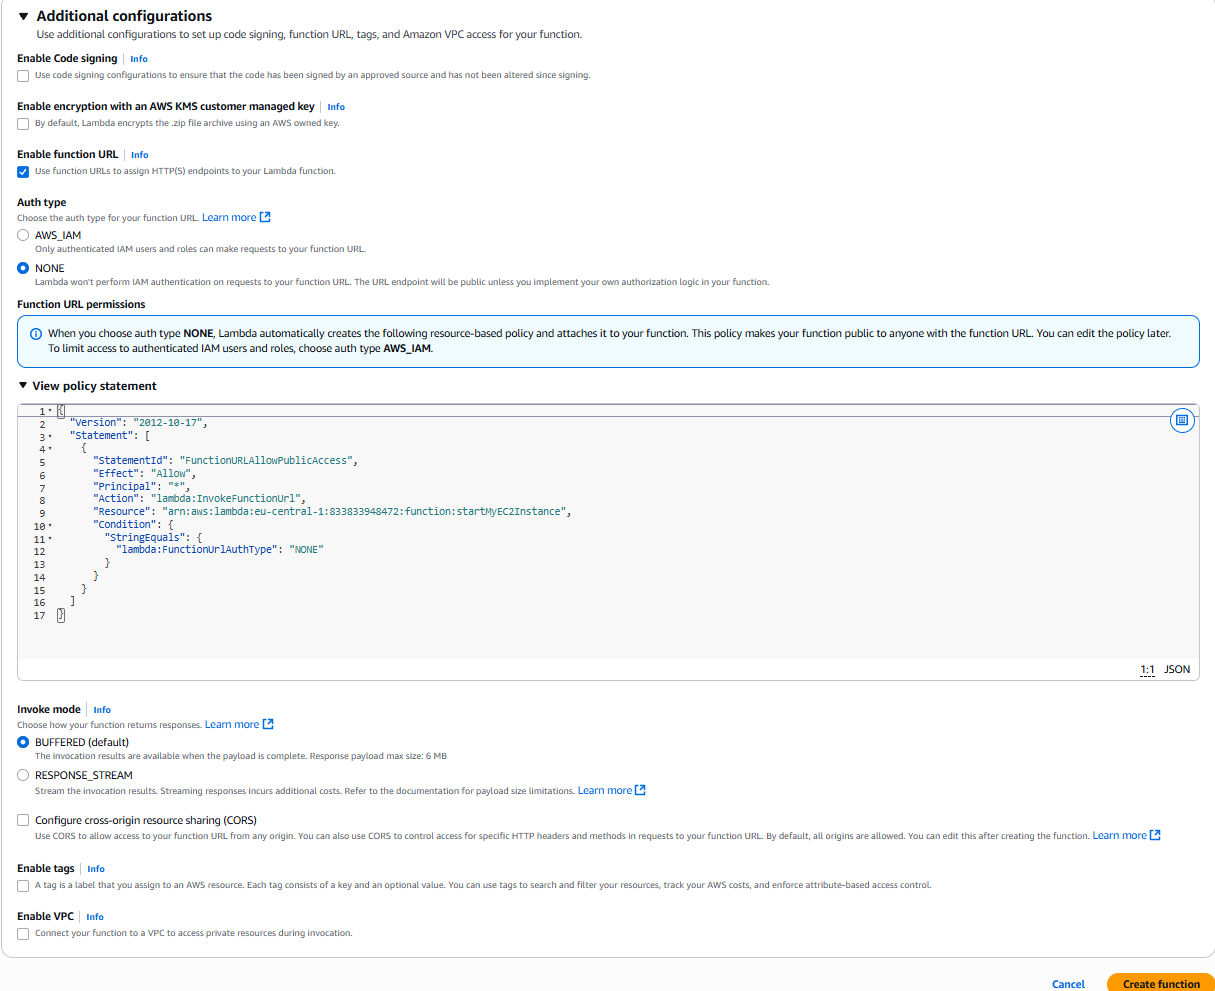
Now click “Create function” down/right.
Add the python code
In the Code tab, paste the following python code in the box under “lambda_function.py”:
import boto3
import json
import pprint
import pyotp

region = 'us-east-1'	# TODO: Change to your region
instances = ['i-123456789abcdef',]   # TODO: change to the instance ID of your ec2 instance
ec2 = boto3.client('ec2', region_name=region)
otpkey = 'ThisIsTheKeyForTheOTPInGoogleAuthenticatorChangeMe' # TODO: change this

def lambda_handler(event, context):
    pw = event['queryStringParameters']['pw']
    print("Password from url: " + pw)
    totp = pyotp.TOTP(otpkey)
    otp_pw = totp.now()
    print("Password from OTP function: "+ otp_pw)
    responseObject = {}
    responseObject['statusCode'] = 200
    responseObject['headers'] = {}
    responseObject['headers']['Content-Type'] = 'application/json'
    if pw == otp_pw:
        ec2.start_instances(InstanceIds=instances)
        print('started your instances: ' + str(instances))
        json_data = [{"result": "ok",
                      "message": "started instance"}]
        responseObject['body'] = json_data
    else:
        print('passwords do not match')
        json_data = [{"result": "error",
                      "message": "passwords do not match. did not start instance"}]
        responseObject['body'] = json_data
    return responseObject
Please change above (line 6-9):
- region to your region (“us-east-1” in the example)
- in the instances list, change “i-123456789abcdef” to your instance-id you want to start (you can use multiple instance-ids in this list if you need to start multiple instances
- also please change the value of otpkey (“ThisIsTheKeyForTheOTPInGoogleAuthenticatorChangeMe”) to something else. This will be the secret used to create the Google Authenticator entry.
Warning: Do NOT put this code exactly on a public git repository, as the otpkey needs to be kept secret.
Note: Lambda will try to create a Cloudwatch LogGroup with the name of the function (“startMyServer” in our example) by default. In our first policy we allow Lambda to access exactly this specific LogGroup. If you named the Lambda Function different from the LogGroup name in the policy, you can change the LogGroup in the Configuration tab (of the lambda function), section “Monitoring and operations tools”, “Logging configuration”, you can change “Log destination” to the name in the policy ("/aws/lambda/startMyServer" in our example).
In the “Code” tab, hit the blue “Deploy” button.

After finishing we can use the “Function URL” on the right side to invoke our function once. This should create the Cloudwatch LogGroup and give us an “Internal Server Error” (we did not provide the GET parameter yet).
So, in the URL field of your browser, please add “?pw=12345” to the URL:
https://abcde12345.lambda-url.us-east-1.on.aws/?pw=12345
This should give you the following error message:
[{"result":"error","message":"passwords do not match. did not start instance"}]
(we need to add the correct code from google authenticator)
Cloudwatch logs
Go to AWS Services > CloudWatch > Logs > Log groups. Under “Log groups” on the right you should see “/aws/lambda/startMyServer”. Click on the name. Under “Log streams” click on the first entry (something like 2025/06/16/[$LATEST]a365f8750e782c947cc0ed2d134b4)
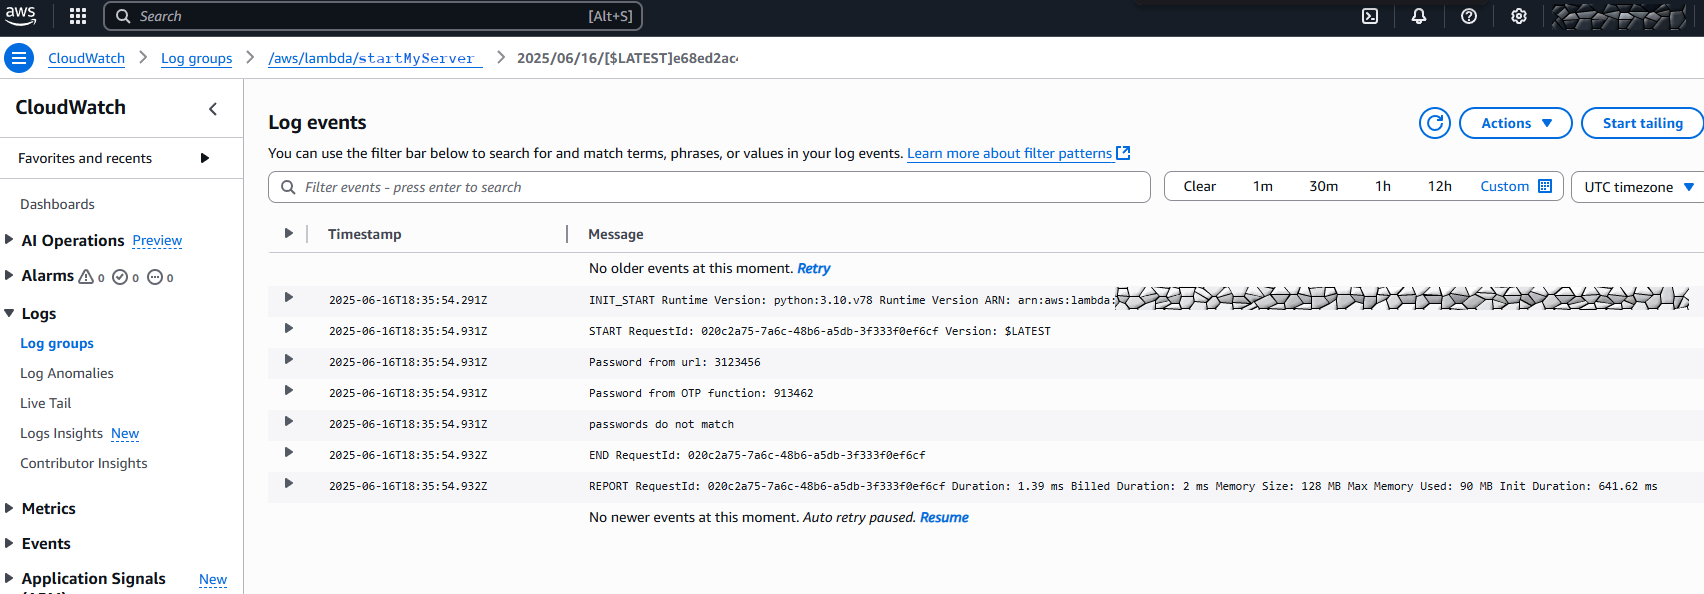
This is also the place to see any python errors you could get.
Next, let’s tag our EC2 Instance and add the OTP to google authenticator.
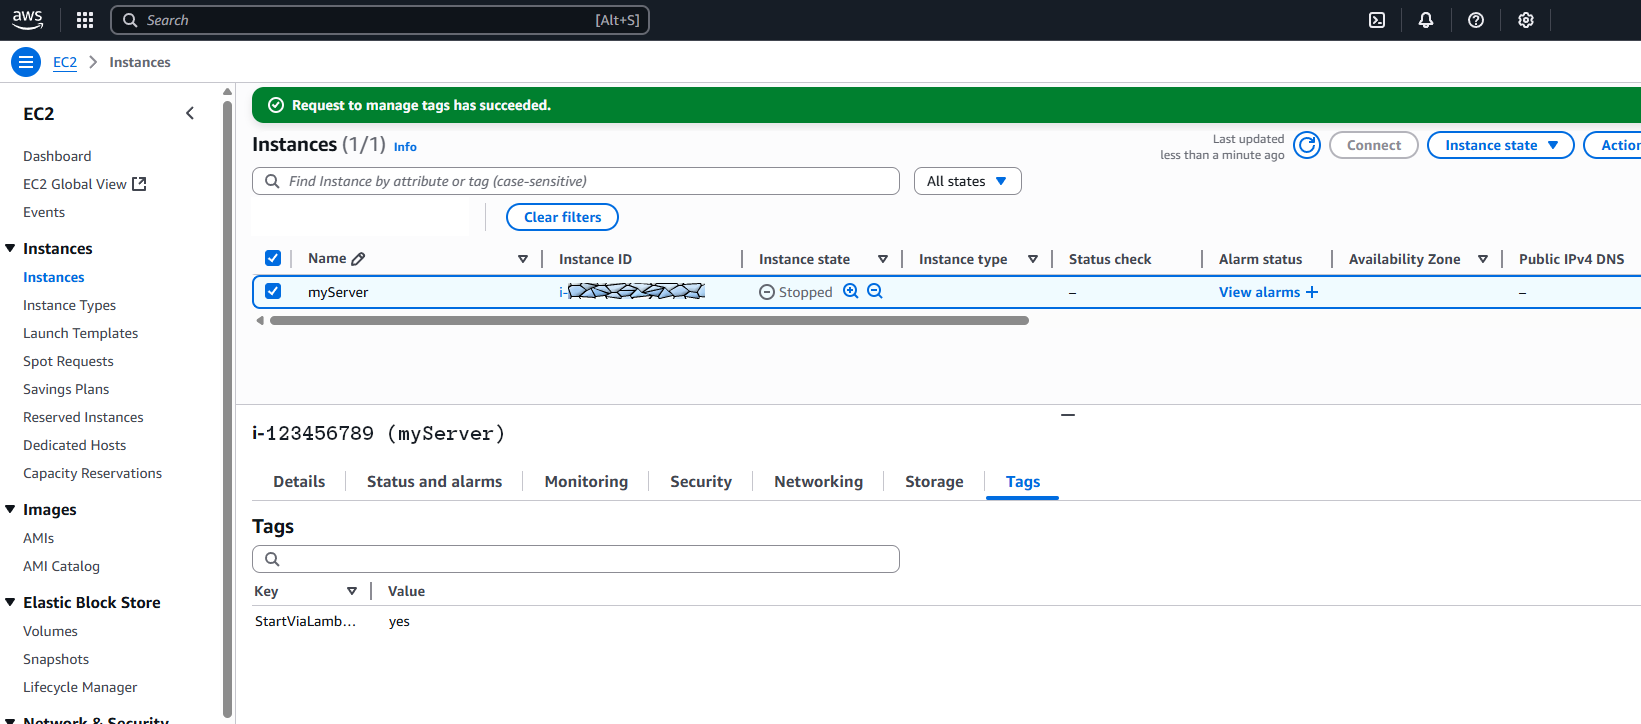
EC2 Instance tags
Now tag the EC2 Instances in your region with the tag “StartViaLambda” as key and with the value “yes” so the Lambda function can actually start them.
(if you are unsure what tags are please read this )
Go to AWS > Services > EC2 > Instances, click on your instance, go to the tab “Tags”, click on “Manage Tags”, click the “Add new tag” button.
Add a new tag with Key “StartViaLambda” and the Value “yes” (this must match the condition in the second policy above: “Condition”: { “StringEquals”: { “aws:ResourceTag/StartViaLambda”: “yes”).
Hit “Save” and this should do. After adding the Google Authenticator entry you should be able to start your Server via the Lambda URL.
Google Authenticator
On your phone (for android you can find it in the google play store), install the Google Authenticator App (by Google LLC):
https://play.google.com/store/apps/details?id=com.google.android.apps.authenticator2&hl=en
Open the App on your Phone, press the colorful + button in the lower right corner. Select “Enter a setup key”.
- for the “Code name” use something like “AWS start myServer”
- for the “Your key” use the key that you put as “otpkey” in the Lambda Function above (otpkey = ‘ThisIsTheKeyForTheOTPInGoogleAuthenticatorChangeMe’). Do NOT use this exact one. It is just an example. Please come up with your own key. Also keep it secret.
- for “Type of key” use “Time based”
After hitting “Add” your new time based OneTimePassword should be in the list.
Now you can open your Lambda function URL, add the current OTP to the end and you should get the response “[{‘result’:‘ok’,‘message’:‘started instance’}]”
https://abcde12345.lambda-url.us-east-1.on.aws/?pw=678910
(of course replace the url by your actual Lambda function URL and instead of the 678910 use the current OTP from Google Authenticator.
To be a bit clearer regarding the URL, to assemble the whole url, please concatenate
- the “Function URL” from the Lambda page (see screenshot, on the right under the Function ARN)
- ?pw=
- the OTP Code from google authenticator
this will result in something similar to above URL.
Tipp: Better not add the code at the end of the 60 seconds. When you open the page when the code resets it will probably fail. Just make sure you have enough time to change the URL in your browser and open it.